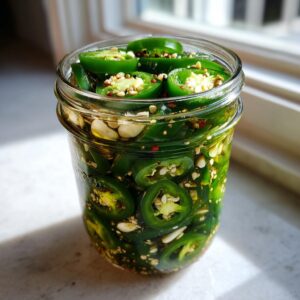
Oh boy, do I have a game-changer for your taco nights! These quick pickled jalapeños have been my secret weapon for adding instant zing to everything from nachos to scrambled eggs. I started making them years ago when my kids complained boring supermarket pickles always stole the show from their tacos. Now? We go through a jar every week – between taco Tuesdays, pizza Fridays (trust me, they’re amazing on pepperoni), and sneaking them straight from the jar when no one’s looking. There’s something magical about how that tangy vinegar cuts through the jalapeño’s heat, creating the perfect spicy-sour crunch. And the best part? You probably have all the ingredients in your pantry right now!
Why You’ll Love These Pickled Jalapeños
Listen, if you’ve ever stared at a sad takeout taco wishing it had more personality… these pickled jalapeños are your answer. I swear by them because:
- They’re crazy fast to make – we’re talking 20 minutes tops from chopping to jar!
- That tangy-spicy punch wakes up everything from eggs to grilled cheese (try it, you’ll thank me).
- Meal planning magic – I always have a jar ready for taco nights, Buddha bowls, or when pizza needs a fiery upgrade.
- No special gadgets needed – just a pot and whatever jar you’ve got in the recycling bin.
Seriously, these little green rings will become your fridge’s MVP. My husband once ate them straight from the jar – that’s how addictive they are!
Ingredients for Pickled Jalapeños
Here’s the beauty of this recipe – it’s all about simple ingredients making BIG flavor! I like to gather everything before starting because once that vinegar starts simmering, things move fast. Go for fresh jalapeños – they should feel firm with smooth, shiny skin. Wrinkly ones won’t give you that perfect crunchy bite we love. And please, please use good vinegar! That cheap stuff in plastic bottles? It’ll make your pickles taste like a science experiment. Here’s what you’ll need:
- 10 jalapeños (about 1 lb), sliced into ¼-inch rings
- 1 cup white vinegar (I swear by Heinz or Bragg)
- 1 cup water (filtered if your tap tastes funny)
- 1 tbsp sugar (more if you like “cowboy candy” sweetness)
- 1 tbsp salt (kosher or sea salt works great)
- 2 cloves garlic, gently crushed (just whack ’em with your knife!)
- 1 tsp black peppercorns (or ½ tsp ground if that’s what you’ve got)
See how flexible this is? That sugar and salt measurement is just my starting point – taste as you go! Want more sweetness? Add another tablespoon sugar. Less salty? Cut it back. That’s the joy of homemade – you’re the boss of your brine!
How to Make Pickled Jalapeños
Okay, ready to turn those fresh jalapeños into something magical? I promise this is SO easy – my 10-year-old helps me make these now! Just follow these simple steps, and you’ll have pickled jalapeños ready to jazz up your meals in no time. The key is working quickly once that brine is boiling, so I like to have everything prepped and within arm’s reach. Safety tip: Open a window or turn on your vent – that vinegar steam packs a punch!
Step 1: Prepare the Jalapeños
First things first – protect those hands! I learned the hard way that jalapeño oil doesn’t wash off easily (ouch!). Slip on some disposable gloves if you have them. Now grab your sharpest knife and slice those babies into ¼-inch rings. Want more heat? Keep the seeds in (that’s my style!). Mild pickles? Scrape out the seeds and white membranes first. Pro tip: I sometimes do half fully loaded and half mild – perfect compromise for mixed crowds!
Step 2: Make the Brine
This is where the magic happens! Combine vinegar, water, sugar and salt in a non-reactive pot (stainless steel or enamel works great). Crank the heat to medium-high and stir until everything dissolves – about 2 minutes. Once it hits a rolling boil, add your garlic and peppercorns. Here’s my canning safety soapbox: If you’re preserving these long-term, DO NOT tweak the vinegar-water ratio – it’s crucial for preventing bacteria. For fridge pickles though? Feel free to play with flavors!
Step 3: Combine and Store
Alright, moment of truth! Pack those sliced jalapeños into CLEAN jars (more on that in a sec), leaving about ½ inch headspace. Carefully pour the boiling brine over them, making sure all the peppers are submerged. For fridge pickles: Just pop the lid on after they cool and store for up to 2 weeks – the flavor gets better daily! For shelf-stable jars: Wipe the rims, seal tight, and process in a boiling water bath for 10 minutes. Listen for that satisfying “ping” as they cool – music to a pickler’s ears!
Tips for Perfect Pickled Jalapeños
After making countless batches of these fiery little delights, I’ve picked up some tricks that take them from good to “Wow, did you really make these at home?” Here are my can’t-live-without tips:
- Control the heat – Leave seeds in for maximum fire (my husband’s favorite), or scrape them out for mild pickles that even kids enjoy. I often split the batch half-and-half by marking lids with “HOT” and “MILD” in Sharpie!
- Mix up your vinegar – Swap white vinegar for apple cider vinegar when I’m craving something fruitier – heavenly on pulled pork sandwiches!
- Label like a pro – Always write the date on jars with painter’s tape (comes off clean). My meal planning secret? Jot down recipe ideas right on the label – “TRY ON: tacos, nachos, avocado toast”.
- Crunch rescue – My grandma’s trick? Add a grape leaf to each jar before pouring brine. The tannins keep jalapeños crisp for weeks! No grape leaves? A pinch of black tea works too.
These little tweaks make such a difference – just ask my neighbors who keep “accidentally” stopping by when I’m making a fresh batch!
Ways to Use Pickled Jalapeños
Oh, where do I start with these little flavor bombs? When I make a batch of pickled jalapeños, they disappear faster than hotcakes in my house! Here’s how we use them to wake up even the simplest meals:
On taco nights, they’re the superstar topping – that tangy crunch takes tacos from “meh” to “more please!” I also love tossing them into scrambled eggs for breakfast, or mixing into tuna salads for lunch. Dinner emergencies? A handful transforms boring burgers into something special, and they’re crazy good on BBQ chicken pizza (my kids’ weird-but-awesome creation). Meal planning tip: Make a double batch when you grill burgers – they’ll keep in the fridge and jazz up your meals all week!
Storing and Shelf Life
Here’s the scoop on keeping your pickled jalapeños happy and safe! For refrigerator storage – my go-to for quick batches – they’ll stay perfectly tangy and crisp for about 2 weeks (if they last that long in your house!). Canned jars? Those beauties can live in your pantry for up to a year. Important safety note though: Always check canned jar seals before eating – lids should be concave and not flex when pressed. Hearing that satisfying “pop” when opening means you’re good to go!
Pickled Jalapeños FAQ
I get asked about these fiery little pickles ALL the time – here are the questions that pop up most often in my kitchen and from readers:
Can I reuse the brine from pickled jalapeños?
Oh sweetie, no – and trust me, I learned this the hard way! That brine absorbs all the jalapeño’s oils and loses its acidity after one use. Trying to reuse it is begging for mushy veggies and potential bacteria. But hey – here’s my grandma’s trick: Use leftover brine to make the most killer marinade for chicken (just discard after 2 hours).
How do I make them less spicy?
Easy fix! Scrape out those seeds and white membranes before pickling – that’s where most of the heat lives. Want even milder? Swap half the jalapeños for sliced sweet peppers. My kids prefer this “training wheels” version when they’re building up their heat tolerance!
Can I add other vegetables to the jars?
Absolutely! Carrots and onions are my favorite adds – they soak up that spicy brine beautifully. Toss in some cauliflower florets for next-level pickled veggies. Pro tip: Hard veggies like carrots need an extra minute of simmering to soften up perfectly.
Why did my pickled jalapeños turn soft?
Ah, the heartbreak! Usually this means either the brine wasn’t boiling hot enough when poured, or jars weren’t properly sealed. My foolproof trick? Add a pinch of calcium chloride (sold as Pickle Crisp) to each jar – keeps them crunchier longer than my willpower around a fresh batch!
Nutrition Information
Here’s what you’re looking at per tablespoon of these zesty pickled jalapeños: Just 5 calories and about 1 gram of sugar – practically guilt-free flavor bombs! Of course, these numbers can wiggle a bit depending on your exact ingredients (I’m looking at you, heavy-handed sugar pourers). The best part? They pack all that punch with zero fat or cholesterol. Not too shabby for something that transforms boring meals into fiestas!
Share Your Pickled Jalapeños
I’d love to see your fiery creations! Snap a pic of those gorgeous jars and tag me @CarlasCooking – nothing makes me happier than seeing your kitchens filled with the same spicy joy as mine.
PrintQuick Pickled Jalapeños
A tangy, spicy pickle perfect for tacos, nachos, and more. Easy to make with simple ingredients.
- Prep Time: 10 min
- Cook Time: 10 min
- Total Time: 20 min
- Yield: 1 pint 1x
- Category: Condiment
- Method: Pickling
- Cuisine: Mexican
- Diet: Vegan
Ingredients
- 10 jalapeños, sliced
- 1 cup white vinegar
- 1 cup water
- 1 tbsp sugar
- 1 tbsp salt
- 2 cloves garlic, crushed
- 1 tsp black peppercorns
Instructions
- Slice jalapeños into rings.
- Combine vinegar, water, sugar, salt, garlic, and peppercorns in a pot. Bring to a boil.
- Add jalapeños and simmer for 5 minutes.
- Transfer to a clean jar and let cool before refrigerating.
Notes
- Store in the fridge for up to 2 weeks.
- For canning, process jars in boiling water for 10 minutes.
- Adjust sugar and salt to taste.
Nutrition
- Serving Size: 1 tbsp
- Calories: 5
- Sugar: 1 g
- Sodium: 100 mg
- Fat: 0 g
- Saturated Fat: 0 g
- Unsaturated Fat: 0 g
- Trans Fat: 0 g
- Carbohydrates: 1 g
- Fiber: 0 g
- Protein: 0 g
- Cholesterol: 0 mg


