 Skip to content

When the weather gets warm, my craving for something bright, tangy, and refreshingly cold kicks in hard. I need dessert that screams sunshine but doesn’t demand I turn on that sweltering oven! That’s exactly why these **no-bake lemon bars** are my go-to secret weapon when guests pop over unexpectedly. Seriously, they come together faster than my coffee brews. I absolutely adore citrus desserts, and the magic here is watching that vibrant filling magically firm up just by sitting patiently in the fridge. Thanks to a simple graham cracker crust and a filling reliant on cream cheese and condensed milk, these are easily the most requested summer treat around my house. If you want to know more about my journey from marketing exec to full-time home cook, check out my story here: my kitchen adventures.

- Why You Will Love These No Bake Lemon Bars
- Ingredients for Perfect No Bake Lemon Bars
- Essential Equipment for Your No Bake Lemon Bars
- How to Prepare Simple Lemon Bar Recipe Without Baking
- Tips for Success with Your No Bake Lemon Bars
- Ingredient Notes and Substitutions for Chilled Lemon Squares
- Storage and Make Ahead Lemon Dessert Tips
- Frequently Asked Questions About No Bake Citrus Squares
- Estimated Nutritional Data for This Summer Lemon Dessert Chilled
Why You Will Love These No Bake Lemon Bars
Forget everything you think you know about fussy lemon desserts. These **no-bake lemon bars** are sunshine in a square, but without any of the waiting around for the oven to heat up (or cool down!). When I pull these out, I feel like I’m winning at dessert time every single time. They are truly the best way to get a big flavor payoff for almost zero active work.

- They set up beautifully without any eggs or gelatin, which I know some of you stress about!
- The bright, fresh lemon taste shines through perfectly because we aren’t compromising it with heat.
- They are sturdy enough to stack and transport, making them the best no bake lemon dessert for parties.
- You can literally whip up the base and filling in the time it takes to empty the dishwasher.
Quick Refrigerated Lemon Squares
If you’re looking for speed, this is it. The active prep time clocks in at just about 15 minutes! That’s phenomenal when you realize you end up with 16 beautiful, tangy squares. You can find yourself enjoying these **quick refrigerated lemon squares** before the sun even sets—perfect for those surprise summer dinner invites or when you just need a quick citrus fix.
Creamy No Bake Lemon Filling Texture
This is where the magic happens, folks! The texture is somewhere between a bright lemon mousse and a light cheesecake. We use cream cheese and sweetened condensed milk to create that incredibly **creamy no bake lemon filling**. Unlike baked bars which can sometimes get grainy or dry fast, the filling here stays silky smooth and wonderfully rich, even after a couple of days in the fridge. It’s the ultimate **simple lemon bar recipe without baking** that always impresses.
Ingredients for Perfect No Bake Lemon Bars
Getting the right ingredients measured out is half the battle won when you’re making a no-bake dessert. Since we aren’t using an oven to fix our mistakes, precision right here in the measuring bowl is key! I promise you, stocking up on these few simple items will let you whip up the best **no bake lemon bars** this season. I’ve broken down everything you need below so you can gather your supplies before diving into the assembly.
For the Graham Cracker Crust Lemon Bars No Bake
The base needs to be strong, firm, and perfectly buttery to hold up that creamy top layer! This is where we develop that classic, delicious texture everyone loves in **graham cracker crust lemon bars no bake** recipes.
- 1 1/2 cups graham cracker crumbs (the finer, the better!)
- 1/4 cup granulated sugar (just a touch for sweetness in the base)
- 6 tablespoons unsalted butter, melted (don’t skimp here, it’s the binder!)
For the Creamy No Bake Lemon Filling
This filling is rich, dreamy, and requires no heating whatsoever. The combination of the condensed milk and acid from the lemons does all the heavy lifting to make sure these set up beautifully firm.
- 1 (14 ounce) can sweetened condensed milk (the crucial setting agent!)
- 1/2 cup fresh lemon juice (Seriously, use fresh—it makes all the difference for that vibrant flavor!)
- 1 teaspoon lemon zest (don’t forget this; it packs a huge aromatic punch!)
- 1 (8 ounce) package cream cheese, softened (this needs to be truly soft so it mixes smooth!)
- 1/4 cup powdered sugar (reserved only for dusting the top at the very end)
Essential Equipment for Your No Bake Lemon Bars
Okay, so since we are skipping the oven magic, we aren’t hauling out every single bowl we own, thank goodness! But there are a few non-negotiable tools you absolutely need to ensure your **no bake lemon bars** come out looking professional and set perfectly flat. Think of this as setting up your chilled dessert assembly line!
You don’t need fancy gadgets, but having the right base container makes cleanup a breeze. Here are the essentials I always grab when making these citrus squares for the fridge:
- 8×8 Inch Baking Pan: This is the sweet spot for thickness. If you use something deeper, your chilling time will increase significantly. If you use a 9×13, they get too thin and squishy, which nobody wants!
- Parchment Paper: This is my biggest tip, seriously. You need to line the pan completely, leaving a two-inch overhang on two sides. This acts as a sling so you can lift the entire block of set bars right out when it’s time to cut them. It’s an absolute lifesaver.
- Electric Mixer (Handheld or Stand): While you *could* try to cream the cream cheese by hand, you really need that power to get the cream cheese silky smooth before adding the condensed milk. Trust me, mixer fatigue is real, so break out the electric buddy for this!
- Rubber Spatula: You’ll need this to scrape down the sides of the bowl when mixing the filling and, importantly, to smooth the top of the filling perfectly flat before it goes into the chilling cave.
- Sharp Knife for Cutting: Once chilled, use a long, sharp knife dipped in hot water between cuts. This keeps the creamy filling from sticking to the blade and gives you those clean, gorgeous squares.
Having these items ready means you are only about 15 minutes away from having your **no bake lemon bars** ready for their long chill! That’s what I call efficiency!
How to Prepare Simple Lemon Bar Recipe Without Baking
Since we are ditching the oven, this recipe becomes all about preparation and patience—the patience required for chilling, not baking! If you follow these steps carefully, you will have the most gorgeous, set-up **no bake lemon bars** ready to impress. We start with the base and build that creamy lemon layer right on top. Remember to always check the recipe post for extra tips, and if you’re enjoying these easy recipes, make sure to browse the rest of my tips over on the main blog page here: Carla’s Cooking Blog.
Creating the No Oven Lemon Slice Recipe Crust
This crust is wonderfully straightforward and super sturdy, which is exactly what this **no oven lemon slice recipe** needs for support!
- First things first: get your 8×8 pan lined with parchment paper, leaving those generous overhangs—we need those handles later!
- In a medium bowl, combine the graham cracker crumbs with that little bit of granulated sugar we save just for the crust (about 1/4 cup). Give it a quick whisk to distribute.
- Pour in the melted butter. Now, use a fork or your clean hands to mix everything together until those crumbs look evenly damp—like slightly wet sand.
- Press this mixture firmly and evenly into the bottom of your prepared pan. I like to use the bottom of a flat measuring cup to really pack it down tight against the bottom. Seriously pack it!
- Pop the pan into the freezer while you mix up that incredible filling. A quick freeze helps lock the crust in place before the heavy filling goes on.
Mixing the Smooth Lemon Filling
Since we rely on chemical reactions for setting here, the order we add ingredients matters a lot! We need everything perfectly smooth before the lemon juice hits the party.
- Get your softened cream cheese into a large bowl (or stand mixer bowl). Beat it until it looks completely creamy and lump-free. This needs to be flawless before step two!
- Slowly start adding that can of sweetened condensed milk while continuing to beat on medium speed. Mix until everything is beautifully combined and has that smooth, thick texture we are aiming for.
- Now, gently mix in your fresh lemon juice and the zest. This part is critical: as soon as the lemon juice mixes with the milk proteins, everything starts to tighten up. Mix just until it is incorporated and streak-free. Stop mixing immediately after that point! Overmixing once the acid is in can sometimes prevent a truly perfect set.
- Pour this glorious yellow mixture right over your chilled crust. Use your spatula to gently smooth the top into an even layer—you want a flat surface for clean serving later!
Chilling and Serving the Make Ahead Lemon Dessert
This is the hardest step because it requires you to walk away, but trust me, your patience will pay off in the best **make ahead lemon dessert** you’ve ever made!
- Cover the pan carefully with plastic wrap. Make sure that wrap doesn’t touch the surface of the filling, or you’ll mess up your beautiful smooth top!
- Refrigerate for a minimum of four hours. I always try to let mine go overnight, as that ensures maximum firmness. If these **no bake lemon bars** aren’t firm, they’ll squish when you cut them, and nobody wants a sad lemon puddle!
- When ready to serve, use those parchment paper ‘handles’ you left hanging over the sides to lift the entire dessert block out of the pan and place it onto a cutting board.
- Using a very sharp, clean knife (wipe it between cuts!), slice the block into 16 squares.
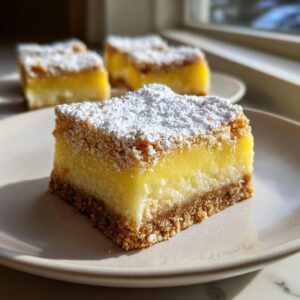
- Right before you place them on your serving platter, give a very light, delicate dusting of powdered sugar over the top. Done! Perfection, no oven required!

I really hope you enjoy this process! Making these is so satisfying because it proves you don’t need a complicated baking schedule to pull off an amazing, bright, and elegant **simple lemon bar recipe without baking**.
Tips for Success with Your No Bake Lemon Bars
Even though these are simple **no bake lemon bars**, there are a few insider tricks I’ve picked up over the years of testing that ensure your filling sets like a dream and your crust stays crisp. Remember, when you remove the oven from the equation, the refrigerator has to do all the work, so we need to help it along! If you’re looking for another incredible, hands-off recipe featuring bright flavors, you have to check out my Avgolemono soup—it’s surprisingly easy! You have to check out my Avgolemono soup—it’s surprisingly easy!
Here are the three most important things I stress when someone tells me their bars didn’t set quite right:
- Temperature Control for the Filling: Make sure that cream cheese is truly, fully room temperature softened. If it’s cold, you will end up with little lumps of cheese mixed in with your smooth filling. Beat that cream cheese until it looks fluffy almost on its own before you drizzle in the condensed milk.
- The Lemon Juice Effect: When you add the fresh lemon juice and zest, you are activating the setting process caused by the acid reacting with the milk proteins. Mix only until *just* combined. If you go too fast or too long here, you risk breaking the chemical bond that holds everything together, leading to a softer center.
- Patience is Non-Negotiable: This is my biggest plea! You absolutely *must* respect the chilling time. Four hours is the absolute minimum, but honestly, if you can manage it overnight, you will get the cleanest, firmest cuts. Resist the urge to peek or try cutting them early, or you’ll get that weeping, messy bottom layer.
And speaking of cutting, remember the trick I mentioned earlier? Use a clean, hot knife. Run it under hot water for a few seconds, wipe it dry, and then slice. Repeat that process for every single cut. This yields the gorgeous, perfect squares you see pictured, making your **no bake lemon bars** look like they came from a fancy pastry shop!

Ingredient Notes and Substitutions for Chilled Lemon Squares
You know how sometimes you’re mid-recipe and realize you’re out of graham crackers? We’ve all been there! My kitchen is about making do with what we have, as long as the flavor profile stays bright and delicious. Because these are **no bake lemon bars**, we have a little more flexibility with the base than when we are dealing with actual baking, but we still have to be thoughtful about how we swap things out.
I always encourage people to experiment safely, especially with the crust, since we aren’t worrying about oven temperatures affecting the structure. Here are a few thoughts I have on swapping out components for these yummy **chilled lemon squares**.
Crust Substitutions That Still Set Up Firmly
If you don’t have graham crackers on hand, don’t panic! The goal of the crust is to provide a sweet, buttery, slightly snappy base that holds its shape. The secondary goal for these **graham cracker crust lemon bars no bake** is that they need to be fine enough to pack down tightly.
- Vanilla Wafer Crumbs: These are my absolute favorite swap! They are already sweet, slightly crisp, and they crush down beautifully. You can use them basically one-for-one with the graham crackers. They give the bar a lovely, even lighter color too.
- Shortbread Cookies: If you have any leftover shortbread, crush those up! They add a nice richness because of the higher butter content already in the cookie. You might even need to reduce that 1/4 cup of added sugar slightly for the crust, just taste the crumbs before you add the butter to be sure!
- Pretzels (For a Tangy Twist): Okay, this is for the adventurous bakers among us! If you are making these, you can substitute about half the graham cracker crumbs with finely crushed pretzels. The saltiness against the tart lemon filling is incredible, but you MUST leave out the extra 1/4 cup of sugar in the crust recipe. You still need that butter to bind them, though!
Tips for Ensuring the Cream Goes Smoothly
The filling relies on two main players for its structure: the cream cheese and the condensed milk. Regarding these, I have very strict feelings because they are essential to achieving that **creamy no bake lemon filling** without using gelatin or eggs.
- Don’t Substitute the Condensed Milk: Please don’t try to substitute this with evaporated milk! Evaporated milk doesn’t have the necessary sugar content, and without that sugar, the filling will never set up properly in the fridge. Keep that can on hand!
- Full-Fat Cream Cheese is Your Friend: I know it’s tempting sometimes to grab the low-fat or Neufchâtel version, but I strongly advise against it here. The fat content in the full-fat cream cheese is vital for the texture and richness. If you use low-fat, your bars can end up slightly spongy or watery after chilling.
Follow these simple direction swaps, and you’ll still end up with the most delicious **no bake lemon bars** you’ve ever made. It’s all about understanding what each ingredient *does*, whether you’re using the classic recipe or a little substitution!
Storage and Make Ahead Lemon Dessert Tips
One of the absolute best things about making these amazing **no-bake lemon bars** is that they are built to last, which makes them the perfect **make ahead lemon dessert**! Seriously, knowing I can whip these up on Sunday and have a bright, ready-to-go dessert for Wednesday is such a stress reliever for me. Since this recipe relies on chilling to set everything up, storage is just as important as the mixing steps.
You can keep these beauties tucked away in the fridge for several days, maintaining that beautiful creamy texture. If you are planning a big gathering or just want a constant supply of sunshine squares, you’ll want to know the best way to store them and if you can freeze them for later!
For full details on making things ahead of time for busy weeks, I always recommend checking out my guide on freezer-friendly meals, which covers making things ahead, like my make ahead breakfast burritos!
Refrigeration: The Key to Keeping Them Firm
Once your **no-bake lemon bars** are fully chilled and cut, they need to stay cold to maintain that perfect, non-squishy structure. Store the squares in an airtight container lined with parchment paper in the refrigerator.

- How Long They Last: I find they are consistently at their absolute best for about 3 to 4 days in the fridge. After day four, the graham cracker crust can start to absorb a little too much moisture from the filling and soften up a bit. They are still totally edible, but they lose that initial satisfying snap.
- Keep Away from Smells: Because the filling is so rich in dairy (hello, cream cheese!), make sure you seal that container tightly. You don’t want your lovely lemon squares absorbing any lingering onion or garlic smells from the fridge. That would be a citrus tragedy!
Can You Freeze These Lemon Bars?
Yes, you absolutely can freeze these! This is a fantastic option if you are using them for an event far in the future. Freezing locks in that fresh brightness extremely well, provided you prep them right.
- Freeze Before Cutting (Preferred): I recommend wrapping the entire chilled, uncut block of bars tightly in plastic wrap first. Then, wrap that whole package in a layer of aluminum foil. This double layer prevents freezer burn and odor transfer. Freeze flat for up to two months.
- Freezing Cut Squares: If you prefer to freeze them already cut, lay the squares out on a parchment-lined baking sheet and freeze them individually until they are solid (about an hour). Once solid, transfer them to an airtight freezer bag or container, placing parchment squares between layers so they don’t stick together.
Thawing for the Best Experience
If you freeze them, the thawing process is simple but must be respected so they don’t weep moisture!
Transfer the wrapped, frozen **no-bake lemon bars** (either whole or cut) directly into the refrigerator overnight. They need a slow thaw—at least 6 to 8 hours. Never try to thaw them on the counter at room temperature; a slow chill thaw keeps any condensation on the outside of the wrapping, not on your lovely filling!
When ready to serve the thawed bars, dust them lightly with powdered sugar right before placing them out on the platter. Enjoy knowing you made the most delicious **make ahead dessert** weeks ago!
Frequently Asked Questions About No Bake Citrus Squares
I know when I try a new recipe, I always have a list of niggling questions buzzing in my head. With **no bake lemon bars**, people usually worry about texture, since an oven isn’t there to lend a helping hand! Don’t worry your pretty little head, though. I’ve tested these little gems countless times, and here are the most common things folks ask me about achieving perfect **no bake citrus squares** every single time.
Can I use lime juice instead of lemon juice in these no bake lemon bars?
Oh, that’s a fun idea! Yes, you absolutely can swap the lemon for lime juice and turn these into fantastic Key Lime style bars. It works perfectly because the ratio of acid to sugar in lime juice is very similar to lemon juice, and it reacts the exact same way with the condensed milk and cream cheese to help them set up firm. You will still need about 1/2 cup of fresh juice. If you use lime, you might want to skip the lemon zest entirely and maybe top them with a tiny dollop of whipped cream instead of powdered sugar. It’s a fantastic variation for a **summer lemon dessert chilled**!
Why is my creamy no bake lemon filling not setting?
This is the biggest fear when making **creamy no bake lemon filling**, and usually, it comes down to one of two things! First, did you respect the chilling time? I know I push it, but four hours is *minimum*. If you cut them sooner, the filling is just not chemically set yet. Second, check your ingredients: did you use sweetened condensed milk (not evaporated milk)? The high sugar content is non-negotiable for the setting process. If you’ve chilled it for 8 hours and it’s still looking soupy, you might have added too much liquid somehow, or maybe your cream cheese wasn’t fully mixed in right at the start. Try giving it another dedicated 4 hours in the coldest part of your fridge! Usually, that fixes everything for these **no bake lemon bars**.
Do I have to use graham crackers for the crust?
Not at all! I mentioned substitutions above, but to stress it here: graham crackers are just the easiest, most reliable option. If you don’t have them, vanilla wafer cookies or even store-bought shortbread cookies work like a charm for that **graham cracker crust lemon bars no bake** vibe. Just crush them up super fine, mix them with the butter and the little bit of sugar we call for, press it thoroughly, and pop it in the freezer for 15 minutes to firm up while you make the filling. It’s an easy switch for a consistently great **quick refrigerated lemon squares** result!
Can I make these if I don’t have an electric mixer?
My grandmother certainly didn’t have one when she made her early recipes! While these specific **no bake lemon bars** rely heavily on getting that cream cheese incredibly smooth, you can absolutely do it by hand if you have some elbow grease ready! You’ll need a sturdy whisk and a very firm bowl. Beat the cream cheese for a solid 5 minutes until it’s creamy, *then* beat in the condensed milk until absolutely smooth. It will take longer and you’ll get a great arm workout, but the resulting **creamy no bake lemon filling** will be just as delicious, I promise!
Estimated Nutritional Data for This Summer Lemon Dessert Chilled
Now, I know many of you are tracking your macros or watching sugar intake, and while I am strictly a home cook and not a registered dietitian, I like to give you the best estimates I can for this **summer lemon dessert chilled** based on standard ingredient measurements. Keep in mind that every can of condensed milk and every large lemon varies slightly, so these numbers are a helpful guide, not gospel!
We calculated these based on yielding 16 perfect squares from the batch, using standard full-fat ingredients as the recipe calls for. Think of this as a little bonus information for those planning menus or just curious about what goes into these wonderfully simple treats!
- Serving Size: 1 bar
- Calories: 210
- Sugar: 22g (Mostly from the condensed milk and crust, as expected!)
- Total Fat: 11g
- Saturated Fat: 6g
- Trans Fat: 0g
- Carbohydrates: 26g
- Fiber: 1g
- Protein: 3g
- Sodium: 95mg
- Cholesterol: 25mg
As you can see, these are definitely a treat—that small amount of sugar adds up quickly because of the condensed milk, but honestly, it’s worth every single bite! Since these are refrigerated, they don’t have the added fats you might find in a traditional baked good preparation. Enjoy them as the perfect little bright bite to end a summer meal!
PrintEasy No Bake Lemon Bars with Graham Cracker Crust
Make these simple, creamy no bake lemon bars using a graham cracker crust. This quick refrigerated lemon squares recipe is perfect for a make ahead summer lemon dessert.
- Prep Time: 15 min
- Cook Time: 0 min
- Total Time: 4 hr 15 min
- Yield: 16 servings 1x
- Category: Dessert
- Method: Chilling
- Cuisine: American
- Diet: Vegetarian
Ingredients
- 1 1/2 cups graham cracker crumbs
- 1/4 cup granulated sugar (for crust)
- 6 tablespoons unsalted butter, melted
- 1 (14 ounce) can sweetened condensed milk
- 1/2 cup fresh lemon juice
- 1 teaspoon lemon zest
- 1 (8 ounce) package cream cheese, softened
- 1/4 cup powdered sugar (for topping)
Instructions
- Prepare the crust: Mix graham cracker crumbs and 1/4 cup granulated sugar in a medium bowl. Pour in the melted butter and mix until the crumbs are evenly moistened.
- Press the crumb mixture firmly and evenly into the bottom of an 8×8 inch baking pan lined with parchment paper, leaving an overhang for easy removal. Place the pan in the freezer while you prepare the filling.
- Make the filling: In a large bowl, beat the softened cream cheese with an electric mixer until smooth.
- Gradually beat in the sweetened condensed milk until fully combined and smooth.
- Add the fresh lemon juice and lemon zest. Mix on low speed until just combined. Do not overmix once the lemon juice is added, as this helps the filling set.
- Pour the lemon filling evenly over the chilled crust. Smooth the top with a spatula.
- Cover the pan with plastic wrap and refrigerate for at least 4 hours, or until the filling is firm. For best results, chill overnight.
- Once set, lift the bars out of the pan using the parchment paper overhang. Cut into 16 squares.
- Before serving, dust the top lightly with powdered sugar.
Notes
- For the best texture, use full-fat cream cheese that is truly softened to room temperature.
- If you do not have graham crackers, you can substitute with vanilla wafer crumbs or shortbread cookie crumbs for the crust.
- Chill time is crucial for these no oven lemon slice recipe bars to set properly. Do not rush this step.
Nutrition
- Serving Size: 1 bar
- Calories: 210
- Sugar: 22
- Sodium: 95
- Fat: 11
- Saturated Fat: 6
- Unsaturated Fat: 5
- Trans Fat: 0
- Carbohydrates: 26
- Fiber: 1
- Protein: 3
- Cholesterol: 25