 Skip to content

I can still smell the cinnamon and butter drifting through my grandmother’s Ohio kitchen whenever I make this classic apple pie. Every fall, she’d pull me up onto that rusty red step stool, hand me a peeled apple, and say, “Now pay attention, Carla—this is how we make magic.” Her crust was always flaky perfection, the filling just the right mix of tart Granny Smiths and sweet Honeycrisps bubbling under golden lattice. That first bite still takes me back—to yellow leaves swirling outside her farmhouse window, to flour dusting her apron, to the way we’d sneak extra sugar on top “for good measure.” Now when Thanksgiving rolls around, nothing feels more right than sliding this classic apple pie into the oven, watching the crust puff up just like hers always did. It’s not just dessert—it’s love baked into every slice.


Why You’ll Love This Classic Apple Pie
This isn’t just any apple pie—it’s the kind that makes people’s eyes light up when you bring it to the table. Here’s what makes it so special:
- The perfect apple harmony: Mixing tart Granny Smiths with sweet Honeycrisps gives you that “oh wow” balance of flavor in every bite—just like my grandma taught me.
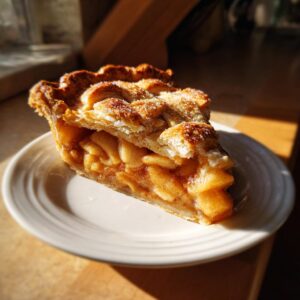
- Crust dreams come true: That flaky double crust? It shatters beautifully when you cut into it, then melts like butter in your mouth (because, well, there’s loads of real butter in there).
- Thanksgiving’s secret weapon: I’ve timed it perfectly—bake it Wednesday night, give it a quick reheat on Thursday, and you’ll look like the most prepared host ever.
- Crowd-pleasing magic: Whether it’s a holiday dinner or just because, this pie disappears faster than you can say “a la mode”—though I highly recommend serving it that way!
Ingredients for Classic Apple Pie
Gathering these simple ingredients is like coming home – you probably have most in your pantry already. Grandma always said the secret’s in the quality, especially that butter and those apples!
For the Flaky Pie Crust
- 2 1/2 cups all-purpose flour (spooned and leveled – no packing!)
- 1 tsp salt (I use fine sea salt, but any works)
- 1 cup unsalted butter, chilled and cubed (key word: cold – I pop mine in the freezer 15 minutes before using)
- 6-8 tbsp ice water (keep it in the fridge until needed)
For the Apple Filling
- 6 cups thinly sliced apples (about 5-6 medium – I do half Granny Smith, half Honeycrisp for perfect tart-sweet balance)
- 3/4 cup granulated sugar
- 2 tbsp lemon juice, freshly squeezed (bottled works in a pinch, but fresh brightens everything up)
- 1 tsp ground cinnamon (I sometimes sneak in an extra 1/4 tsp because YUM)
- 1/4 tsp ground nutmeg (freshly grated if you’re feeling fancy)
- 2 tbsp cornstarch (this prevents the dreaded “soggy bottom”)
For Finishing
- 1 egg, beaten (for that gorgeous golden shine)
- 1 tbsp coarse sugar (those big sparkling crystals make it bakery-level pretty)

How to Make Classic Apple Pie
Alright, let’s get to the fun part—turning those simple ingredients into pie magic! I’ll walk you through each step just like my grandma did for me all those years ago. Don’t worry if your first try isn’t perfect (mine definitely wasn’t!), but follow these steps and you’ll be amazed at what comes out of your oven.
Preparing the Flaky Pie Crust
First things first—that gorgeous crust. The secret? Keep everything COLD. I even chill my mixing bowl sometimes! Cut that chilled butter into your flour and salt until it looks like lumpy breadcrumbs. Now here’s my trick—add ice water just 1 tablespoon at a time, mixing lightly with a fork. Stop as soon as the dough clings together when you press it—we want some visible butter bits for flakiness. Divide it in two (I make one slightly bigger for the bottom crust), wrap in plastic, and let it rest in the fridge. Those 30 chilling minutes are perfect for prepping your apples!
Mixing the Perfect Apple Filling
While the dough chills, let’s make that apple filling sing. Slice your apples about ¼” thick—thin enough to soften, thick enough to keep some bite. Toss them with sugar, lemon juice, and spices in a big bowl, then sprinkle the cornstarch over last. Here’s why I love mixing apple types: the Granny Smiths hold their shape while the Honeycrisps soften into that dreamy jammy texture. Give it all a good stir until every slice glistens. Pro tip—let it sit 10 minutes so the flavors get cozy before baking.
Assembling and Baking Your Classic Apple Pie
Time to bring it all together! Roll out your bottom crust between lightly floured parchment (way easier than countertops!). Transfer it carefully to your pie dish—I like to roll it onto my rolling pin and unroll it over the dish. Pile in that gorgeous apple mixture—it should mound up slightly higher in the center. Now comes the fun part: top crust or lattice? For lattice, weave ¾” strips in a checkerboard pattern. Full crust? Just lay it over, trim the edges, and cut pretty steam vents. Crimp the edges with your fingers or a fork, brush with egg wash, and sprinkle with coarse sugar. Bake at 375°F for 45-50 minutes—if the edges brown too fast, loosely cover them with foil. When it’s golden with bubbling juices peeking through, that’s your happy moment!

Tips for the Best Classic Apple Pie
After making this pie more times than I can count (hello, taste-testing friends and neighbors!), I’ve picked up some game-changing tricks that’ll take yours from good to “can I have the recipe?” levels of amazing:
- Keep it chilly: That dough needs to stay cold right up until it hits the oven. I even pop my rolling pin in the freezer for 15 minutes before using it—sounds extra, but it makes rolling so much easier without sticking.
- Apple alchemy: Don’t skip mixing apple varieties! The tart-sweet combo isn’t just about flavor—the firmer Granny Smiths keep their shape while the Honeycrisps melt into that dreamy softness. Pro tip: taste your apples first—if they’re super sweet, cut back the sugar by a tablespoon or two.
- Edge protector: Around minute 25, check your crust edges. If they’re browning faster than the center, make a foil “necklace” to cover them—just tear aluminum foil into strips and fold them over the rim. Saves you from burnt edges every time!
My first attempt at this pie looked like it lost a fight with a blender—soggy bottom, overcooked edges, the works. But after tweaking everything from apple thickness to cornstarch amounts (and maybe crying over one particularly sad pie), I can confidently say these tips give you that perfect balance of flaky crust and juicy filling that makes people ask for seconds. Trust me—your patience will be rewarded with the most incredible Thanksgiving dessert!
Make-Ahead and Storage Tips
Here’s my golden rule for stress-free holiday baking – make this pie ahead! Bake it completely the day before, let it cool at room temperature, then cover loosely with foil. When Thanksgiving chaos hits, just pop it in a 350°F oven for 15 minutes (20 if it’s straight from the fridge) to bring back that fresh-from-the-oven magic.
Want to freeze it? Assemble the unbaked pie, wrap tightly in plastic, then foil. Freeze solid—it’ll keep beautifully for 3 months. Bake frozen (add 20 minutes to the time). Already baked? Freeze slices in airtight containers for midnight pie emergencies. At room temp, your masterpiece stays perfect for 2 days—if it lasts that long!
Serving Suggestions for Classic Apple Pie
Oh, the possibilities with this pie! My grandma always served it warm with a giant scoop of vanilla ice cream melting over the top – we called it “Ohio snowcaps” when the ice cream dripped down the sides. These days, I love pairing it with:
- Homemade whipped cream (add a dash of cinnamon for extra holiday flair)
- Sharp cheddar cheese slices (a New England tradition my husband introduced me to – surprisingly amazing!)
- Caramel drizzle for those extra-special occasions (I keep a jar of good-quality sauce in my meal planning stash)
At Thanksgiving, I bake two pies – one to serve that day, and another to slice up for post-feast à la mode sundaes when everyone claims they’re full but somehow find “dessert stomach.” Pro tip: set up a toppings bar with nuts, sprinkles, and extra caramel – kids and adults alike go wild!

Classic Apple Pie FAQs
Over the years, I’ve gotten the same pie questions over and over at holiday gatherings—and I love that! Here are the answers to everything you might wonder before making this classic apple pie:
What are the best apples for apple pie?
After testing countless varieties (and eating way too much pie in the process!), I swear by a mix of Granny Smith and Honeycrisp apples. The Granny Smiths bring that perfect tartness and hold their shape, while the Honeycrisps add natural sweetness and melt into luxurious jammy pockets. Some people swear by adding a third variety like Braeburn or Jonathan—go wild if you feel adventurous!
Should I do a lattice or full top crust?
Honestly? Both are delicious—it’s all about what makes your heart happy! A full crust feels extra homey to me (plus it’s easier for beginners), but that lattice top lets you peek at those bubbling apples. If you’re nervous about lattice, try this: weave strips on parchment first, chill them, then slide the whole lattice onto your pie. Game changer!
Can I freeze apple pie before baking?
Absolutely! Freezing is my secret weapon during holiday chaos. Assemble the pie completely—including top crust and egg wash—then freeze solid before wrapping. When baking day comes, pop it straight from freezer to oven (add 15-20 minutes to bake time). You’ll get that “fresh made” taste with zero Thanksgiving morning stress.
How do I prevent a soggy bottom crust?
Oh, we’ve all been there. My triple-defense strategy: 1) Toss apples with cornstarch—it absorbs excess juice, 2) Roll your bottom crust slightly thicker than the top, and 3) Place the pie dish on a preheated baking sheet for extra bottom heat. Bonus tip: brushing the bottom crust with egg white before adding filling creates a moisture barrier. Science + pie = magic!
What’s the best way to reheat leftover pie?
Slice leftovers (if you have any!) and warm them in a 350°F oven for 10 minutes—this crisps the crust back up beautifully. Microwave makes it soggy, but if you’re desperate, 20 seconds with a paper towel underneath helps. Though between us? Cold pie for breakfast is a glorious tradition in my house!
Nutritional Information
Just like my grandma always said, “Pie feeds the soul first—then the belly!” Keep in mind these nutritional estimates for our classic apple pie may vary depending on your specific ingredients and brands. Each slice provides a balanced mix of carbs, fats, and a touch of fiber from all those delicious apples. For exact dietary needs, I recommend using your favorite nutrition calculator with the brands you love!
PrintClassic Apple Pie
A traditional double-crust apple pie with a flaky crust and the perfect mix of apples for a delicious fall dessert.
- Prep Time: 30 min
- Cook Time: 50 min
- Total Time: 1 hr 20 min
- Yield: 8 servings 1x
- Category: Dessert
- Method: Baking
- Cuisine: American
- Diet: Vegetarian
Ingredients
- 2 1/2 cups all-purpose flour
- 1 tsp salt
- 1 cup unsalted butter, chilled and cubed
- 6–8 tbsp ice water
- 6 cups thinly sliced apples (mix of Granny Smith and Honeycrisp)
- 3/4 cup granulated sugar
- 2 tbsp lemon juice
- 1 tsp ground cinnamon
- 1/4 tsp ground nutmeg
- 2 tbsp cornstarch
- 1 egg, beaten (for egg wash)
- 1 tbsp coarse sugar (for sprinkling)
Instructions
- Preheat oven to 375°F (190°C).
- In a large bowl, mix flour and salt. Cut in butter until mixture resembles coarse crumbs.
- Add ice water, 1 tbsp at a time, until dough comes together. Divide into two discs, wrap in plastic, and chill for 30 minutes.
- In another bowl, toss apples with sugar, lemon juice, cinnamon, nutmeg, and cornstarch.
- Roll out one dough disc and fit into a 9-inch pie dish. Add apple filling.
- Roll out the second disc and cut into strips for a lattice top or place whole over filling, crimping edges to seal.
- Brush crust with egg wash and sprinkle with coarse sugar.
- Bake for 45-50 minutes until golden and bubbly. Cool before serving.
Notes
- Use a mix of tart and sweet apples for balanced flavor.
- Chill dough before rolling for easier handling.
- Cover edges with foil if browning too quickly.
- Make ahead: Bake and reheat at 350°F for 15 minutes before serving.
Nutrition
- Serving Size: 1 slice
- Calories: 320
- Sugar: 25g
- Sodium: 150mg
- Fat: 14g
- Saturated Fat: 8g
- Unsaturated Fat: 5g
- Trans Fat: 0g
- Carbohydrates: 45g
- Fiber: 3g
- Protein: 3g
- Cholesterol: 45mg