 Skip to content
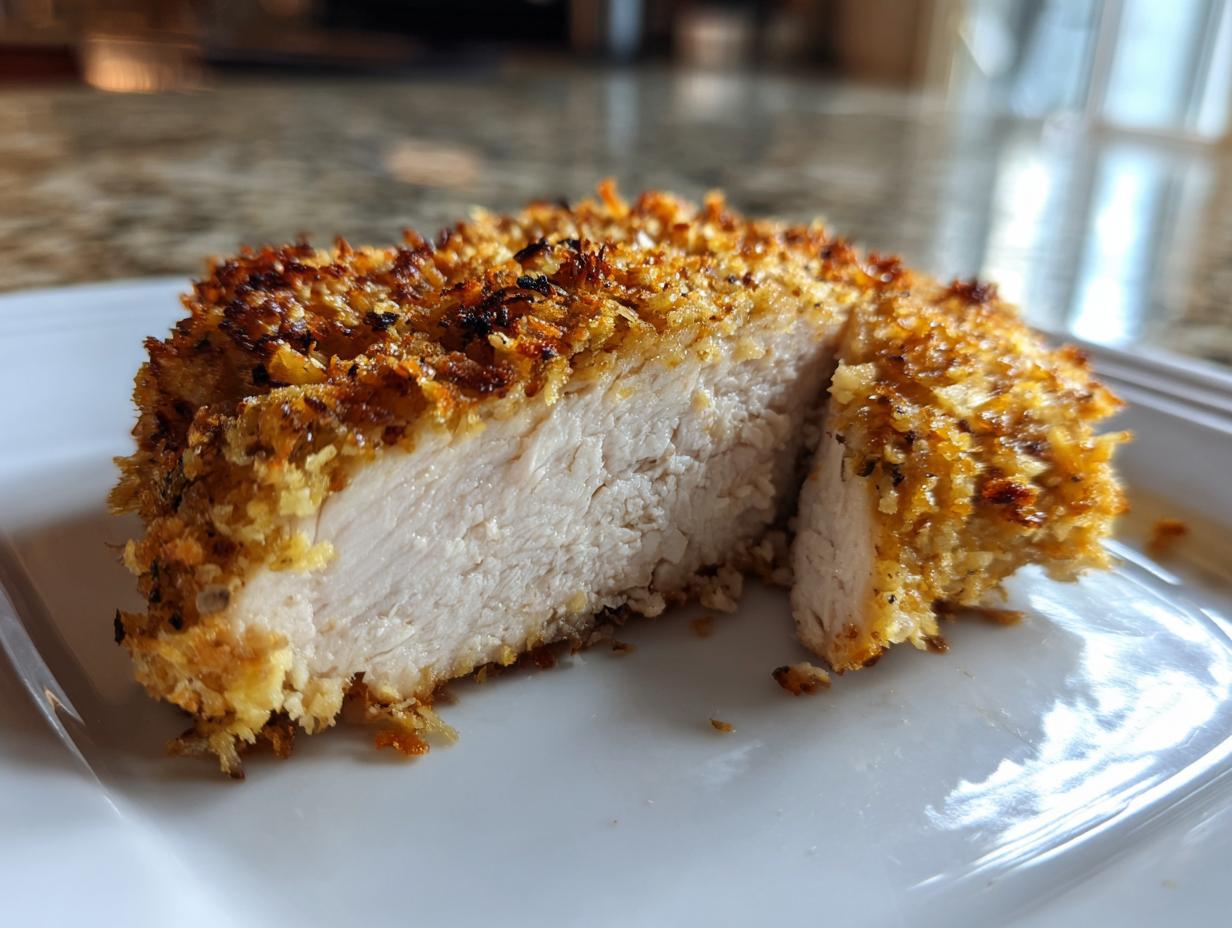

Oh, I know that feeling! It’s 5:30 PM, you’re exhausted from running around all day—I remember those days well from my marketing career—and the last thing you want is a complicated dinner plan. We all deserve soulful, comforting food, even on a hectic Tuesday, right? That’s why I developed this Ultra-Easy & Crispy baked ranch chicken recipe for weeknights. Seriously, ditch the freezer aisle; this delivers the juiciest chicken with a fantastic crispy coating, and it’s ready in under 30 minutes. It’s my go-to trick for bringing that homemade joy back to our busy table!

- Why This Baked Ranch Chicken is Your New Weeknight Staple
- Ingredients for Your Ultra-Easy Baked Ranch Chicken
- Step-by-Step Instructions for **Baked Ranch Chicken**
- Tips for the Best Flavorful Chicken Bake
- Serving Suggestions for Your Easy Chicken Dinner
- Storage and Reheating Oven Baked Chicken
- Frequently Asked Questions About **Baked Ranch Chicken**
- Estimated Nutritional Data for This Ranch Seasoning Chicken
- Share Your Family Favorite Chicken Creations
Why This Baked Ranch Chicken is Your New Weeknight Staple
I truly mean it when I say this recipe is a lifesaver on crazy nights. It checks every box we food bloggers dream of hitting because it’s ridiculously easy but tastes like you spent hours on it. If you’re looking for Simple Chicken Recipes that always win over the family, you’ve found it! You can even serve it alongside my Chicken Chow Mein for a real feast!
- It’s a genuine Easy Chicken Dinner—so minimal prep time, which means less time standing over a hot stove.
- This is the definition of Flavorful Chicken Bake; that ranch packet does all the heavy lifting for you.
- It’s a guaranteed Family Favorite Chicken because who doesn’t love that savory, herby ranch flavor?
- The coating ensures this is a Juicy Baked Chicken success story, not a dry disappointment.
Quick Baked Chicken Ready in Under 35 Minutes
We’re talking 10 minutes of hands-on prep time and about 25 minutes in the oven from start to finish. That puts this whole Oven Baked Chicken adventure under the 35-minute mark—perfect for when you need a great **Weeknight Chicken Recipe** fast!
Achieving Juicy Baked Chicken Texture
The secret to the moisture isn’t just in the chicken itself; it’s the coating! Because we are building a nice little barrier with the flour and panko before we bake, it really locks all those yummy juices right inside the meat. Trust me, this breading technique stops that dreaded dry-out that often happens with Quick Baked Chicken breasts.

Ingredients for Your Ultra-Easy Baked Ranch Chicken
Okay, let’s talk about what you need to make this magic happen. The best part about this Ranch Seasoning Chicken is you probably have most of this stuff just sitting in your pantry already. We’re keeping the ingredient list short and sweet because this is all about a Minimal Prep Chicken dinner, remember?
For four happy diners, here’s what you’ll grab. If you decide to skip the Parmesan cheese for a simpler coating, don’t sweat it—it’s totally optional, but adding it is the easiest way to kickstart that Cheesy Chicken Bake flavor we talked about!
- Four boneless, skinless chicken breasts (make sure they are relatively the same thickness if you can!)
- One full packet (about 1 ounce) of dry ranch seasoning mix—the powdered stuff in the little bag!
- Half a cup of all-purpose flour
- One large egg
- Two tablespoons of milk (any kind works here)
- Half a cup of panko breadcrumbs—these create that incredible crunch!
- One tablespoon of olive oil or melted butter—we need this to help the panko brown up nicely.
- Optional Treat: A quarter cup of grated Parmesan cheese—mix this right in with the panko crumbs if you want that little extra salty kick.
I always keep my ingredients ready to go in little bowls, just like a mini assembly line. You can see some of my favorite setup tools over here, which helps keep things tidy when you’re quickly breading everything.
Step-by-Step Instructions for **Baked Ranch Chicken**
This is where the speed really kicks in! Because we’re using high heat and a fantastic coating system, we can keep this preparation time super tight. When I was running marketing campaigns and trying to get dinner on the table, I relied on clear, fast steps like these. Following this process keeps your baked ranch chicken perfectly coated and unbelievably juicy.
Prep and Oven Setup
First things first, turn that oven on up to 400°F (200°C). We want it nice and hot when the chicken goes in. While it’s heating up, lightly grease your baking sheet. I always toss down a piece of parchment paper underneath for easy cleanup—it saves me scrubbing later!
Next, set up your three coating stations: one shallow dish for your flour mixed with the dry ranch seasoning, a second dish for whisking your egg and milk together (that’s your wash), and finally, a third dish with your panko breadcrumbs and that optional Parmesan cheese.
Coating for Crispy **Baked Chicken**
This is crucial for success! Take your chicken breasts and pat them *really* well with paper towels. I can’t stress this enough—dry chicken equals crispy coating. Don’t skip it!
Now, work quickly through the dipping sequence. First, put the dry chicken into the flour/ranch mix, gently shaking off the excess. Then, dunk it right into that egg wash. Last, and this is the key for that crunch, press it firmly into that panko mixture so both sides get totally covered. You are building a wonderful crust here!

Baking and Resting Times
Place your coated beauties on the sheet and drizzle or brush just a little bit of olive oil or butter over the tops—this helps everything turn golden brown when we bake. They go into that hot oven for about 20 to 25 minutes. You absolutely must cook them until they hit an internal temperature of 165°F (74°C). That’s my non-negotiable rule for safety!
When they come out looking golden and amazing, let them rest on a clean plate for five minutes before slicing. This lets the juices redistribute, guaranteeing a tender easy chicken dinner experience!
Tips for the Best Flavorful Chicken Bake
Now that you’ve mastered the basic coating process, let’s talk about how to customize this for your family! Since I started making this when life was super manic, I’ve learned a few tricks to elevate it from a simple weeknight meal to something truly special. For instance, I once totally rushed the pat-dry step on my chicken breasts before coating them—and boy, did I pay for it! The coating slid right off in the oven, leaving sad, pale chicken. Never again! Taking an extra minute to get that chicken truly dry pays off big time for that perfect crunch.
If you are cooking chicken pieces that vary wildly in thickness—say, one end is super thin and the other is thick—try placing them between two sheets of plastic wrap and gently pounding the thick spots with a meat mallet or even the bottom of a heavy skillet. This gives you an even surface for consistent cooking. It’s a little extra effort, but it ensures every piece cooks evenly, which is key for a reliable Flavorful Chicken Bake.

Making Creamy Ranch Chicken Variations
You asked about alternatives, and yes, we can absolutely dip into the creamy side of life with this recipe! If you want that rich, velvety texture but still want to keep it baked, you can easily transition this to a Creamy Ranch Chicken bake. Instead of just using the plain egg wash, mix about a quarter cup of sour cream or Greek yogurt right into that egg mixture before you dip the floured chicken.
Don’t worry about the little chunks of yogurt; they melt right into the egg wash as they cook, adding amazing tanginess and moisture to the final product. It creates a more deeply flavored coating that really clings to the meat. It’s a heavenly swap, especially if you’re serving this with something simple like rice.
Creating a Cheesy Chicken Bake Topping
When I need to make this feel like a real treat for the family—maybe it’s Friday, or maybe we just survived a tough week—I turn it into a Cheesy Chicken Bake! This is so easy, but the payoff is huge. After you’ve coated the chicken and placed it on the sheet, let it bake for about 15 minutes first, until the coating starts to look firm.
Pull the pan out carefully, sprinkle about half a cup of shredded cheddar, Monterey Jack, or even mozzarella cheese right over the tops. Slide it back in for the last 5 to 10 minutes, or until the cheese is melted, bubbly, and just starting to brown a little. That extra layer of cheese melts down right into the ranch crevices. Wow! It’s totally worth the small added step.

Serving Suggestions for Your Easy Chicken Dinner
One of the best things about this baked ranch chicken is how perfectly it pairs with almost anything! Since we’re aiming for an Easy Chicken Dinner that gets on the table fast, I usually lean towards sides that are either naturally quick or can be tossed in the oven right alongside the chicken.
My absolute favorite pairing for that savory ranch flavor is a simple green vegetable, like steamed green beans tossed with a squeeze of lemon. But if you want something a little heartier, try my Garlic Parmesan Cauliflower Rice—it’s fantastic for soaking up the juices and keeps the meal relatively light. Roasted broccoli or some quick mashed potatoes also make this an extremely satisfying Weeknight Chicken Recipe!
Storage and Reheating Oven Baked Chicken
You know, even the best baked ranch chicken recipes sometimes yield leftovers, and that’s a good thing! I like to think of leftovers as tomorrow’s lunch already handled. When I have extra, I make sure to store it correctly so it’s just as delicious the next day. The key here is preventing the coating from getting soggy while it sits in the fridge.
First, make sure the chicken is totally cooled down before you put it away. If you seal up warm food, steam makes everything weep, and we lose that precious crispiness we worked so hard for! Once cooled, pop the pieces into an airtight container. I usually stack it with a little bit of parchment paper between the pieces if I have bigger cuts, just to make sure no surface is touching another sealed surface for too long. This keeps my Oven Baked Chicken good for about three or four days.
Now, for reheating—this is where most people go wrong! Please, avoid the microwave if you can. The microwave makes that lovely panko coating go instantly soft, and nobody wants that chewy texture on their Simple Chicken Recipe. If you need just one piece fast, the air fryer is your best friend. Set it to about 375°F (190°C) for 5 to 7 minutes. It works wonders to crisp things right back up!
If you’re reheating a larger batch, use your actual oven. Preheat it to 350°F (175°C) and spread the chicken pieces out on a wire rack set over a baking sheet. This allows air to circulate underneath, keeping the bottom crisp too. This method takes a little longer—about 10 to 15 minutes—but it really brings back that fresh-from-the-oven flavor and texture. If you are interested in resurrecting leftovers in a new way, I actually have a fantastic recipe for Mashed Potato Cakes that pairs beautifully with leftover ranch chicken chunks mixed in!
Frequently Asked Questions About **Baked Ranch Chicken**
I’ve compiled some of the questions I get most often when people first try this recipe. If you’re worried about making adjustments or tweaking the timing, hopefully, these quick answers will give you the confidence boost you need to get this **Ranch Seasoning Chicken** in the oven tonight!
Can I use chicken thighs instead of breasts for this **baked ranch chicken** recipe?
Yes, you absolutely can! I actually love the flavor dark meat brings to a Flavorful Chicken Bake, and thighs are notoriously hard to overcook, making them a great choice for hands-off cooking. The main thing to remember is that chicken thighs usually take a little longer to cook than breasts, depending on how thick they are. So, if you swap them out, just forget the time estimate on the recipe card and rely on your thermometer! You’ll want to cook them until they hit that safe internal temperature, which usually means checking around the 30-minute mark.
How do I make this recipe even faster for a **30 Minute Chicken Meal**?
That’s a great goal! If you need to guarantee this is pulled out in under 30 minutes total cooking time, the trick is making sure your chicken is uniform in thickness. If you’re using standard breasts, take a moment to place them between two pieces of plastic wrap and lightly pound them down to about three-quarters of an inch thick. This way, they cook much faster and more evenly! When the chicken is thinner, you can often pull this entire process off in closer to 20 minutes total cooking time, making it a super-speedy Easy Chicken Dinner!
And just a quick note—if you’re looking for other lightning-fast meals, you should check out my recipe for Avgolemono Soup. It sounds fancy, but it comes together surprisingly fast!
Estimated Nutritional Data for This Ranch Seasoning Chicken
Alright, let’s talk numbers for a minute. I know some of you like to track your macros or just need to know what you’re working with, especially when making a guaranteed Family Favorite Chicken like this one. Remember, since we are using a packet of ranch mix and cheese, the sodium is going to be a little higher, so keep that in mind!
The nutrition information below is an estimate for one serving (one chicken breast) based on the ingredients listed in the recipe. This assumes you aren’t overloading it with the optional cheese or dipping it in heavy sauces later—those additions will change the totals, of course. Also, remember that every brand of ranch mix or panko has slightly different values, so these are just my best guess based on standard ingredients I generally use in my kitchen.
- Serving Size: 1 breast
- Calories: 350
- Total Fat: 12g
- Saturated Fat: 3g
- Carbohydrates: 15g
- Fiber: 1g
- Sugar: 2g
- Protein: 45g
- Cholesterol: 110mg
- Sodium: 650mg (This is why I always recommend serving it with a low-sodium veggie on the side!)
If you’re looking for a side that balances out this savory flavor perfectly, you have to try my Chicken Caesar Pasta Salad recipe! It’s got that creamy freshness that really cuts through the richness of the baked ranch chicken wonderfully.
Share Your Family Favorite Chicken Creations
Well, my friends, that is all there is to it! We’ve put together an incredibly delicious, **Juicy Baked Chicken** that tastes like it took hours but really took practically no time at all. I am so thrilled that you’ve chosen to make this Ultra-Easy & Crispy **baked ranch chicken** for your table tonight.
Now, the kitchen is yours! Once you’ve tried this, I really, *really* hope you’ll come back down to the comments section below and leave me a rating. Did you add extra garlic powder to the coating? Did you skip the panko for an even lighter crust? I absolutely love hearing about the little tweaks you make to turn a recipe into your own version of a Family Favorite Chicken. Hearing from you lets me know I’m succeeding in bringing that simple, soulful food back to busy lives!
If you thought this was helpful for getting dinner done quickly, go ahead and save this recipe—it’s one of those must-have solutions for those nights when you just can’t think past the general need for a Weeknight Chicken Recipe. You can always find more quick ideas and dinner inspiration over at my main recipe index!
If you’re sharing pictures on social media, tag me! And for a great alternative recipe, make sure you check out this one I found that I know you’ll love: Easy Baked Ranch Chicken. Happy cooking, and I’ll see you in the next post!
PrintUltra-Easy & Crispy Baked Ranch Chicken for Weeknights

Welcome to my kitchen! This recipe delivers juicy, flavorful baked ranch chicken with a crispy coating, perfect for a family-approved weeknight dinner in under 30 minutes. It is a simple chicken recipe that tastes anything but ordinary.
- Prep Time: 10 min
- Cook Time: 25 min
- Total Time: 35 min
- Yield: 4 servings 1x
- Category: Dinner
- Method: Baking
- Cuisine: American
- Diet: Vegetarian
Ingredients
- 4 boneless, skinless chicken breasts
- 1 packet (1 oz) dry ranch seasoning mix
- 1/2 cup all-purpose flour
- 1/4 cup grated Parmesan cheese (optional, for extra flavor)
- 1 large egg
- 2 tablespoons milk
- 1/2 cup panko breadcrumbs (for crispiness)
- 1 tablespoon olive oil or melted butter
Instructions
- Preheat your oven to 400°F (200°C). Lightly grease a baking sheet or line it with parchment paper.
- Prepare the coating stations. In one shallow dish, combine the flour and dry ranch seasoning mix. In a second dish, whisk the egg and milk together. In a third dish, combine the panko breadcrumbs and grated Parmesan cheese, if using.
- Pat the chicken breasts dry with paper towels. This helps the coating stick and promotes crispiness.
- Dredge each chicken breast first in the flour and ranch mixture, shaking off any excess.
- Dip the floured chicken into the egg wash, allowing any extra to drip off.
- Finally, press the chicken firmly into the panko breadcrumb mixture to coat both sides completely.
- Place the coated chicken breasts on the prepared baking sheet. Drizzle or brush the tops lightly with olive oil or melted butter.
- Bake for 20 to 25 minutes, or until the internal temperature reaches 165°F (74°C) and the coating is golden brown and crispy. For extra flavor, you can broil for the last 1-2 minutes, watching carefully to prevent burning.
- Let the juicy baked chicken rest for 5 minutes before slicing and serving.
Notes
- For a creamy ranch chicken bake variation, mix 1/4 cup of sour cream or Greek yogurt with the egg wash before dipping the chicken.
- If you want a cheesy chicken bake, sprinkle 1/2 cup of shredded cheddar cheese over the tops of the chicken during the last 5 minutes of baking.
- This recipe works well with chicken thighs, but adjust the cooking time based on their thickness.
Nutrition
- Serving Size: 1 breast
- Calories: 350
- Sugar: 2
- Sodium: 650
- Fat: 12
- Saturated Fat: 3
- Unsaturated Fat: 9
- Trans Fat: 0
- Carbohydrates: 15
- Fiber: 1
- Protein: 45
- Cholesterol: 110