 Skip to content
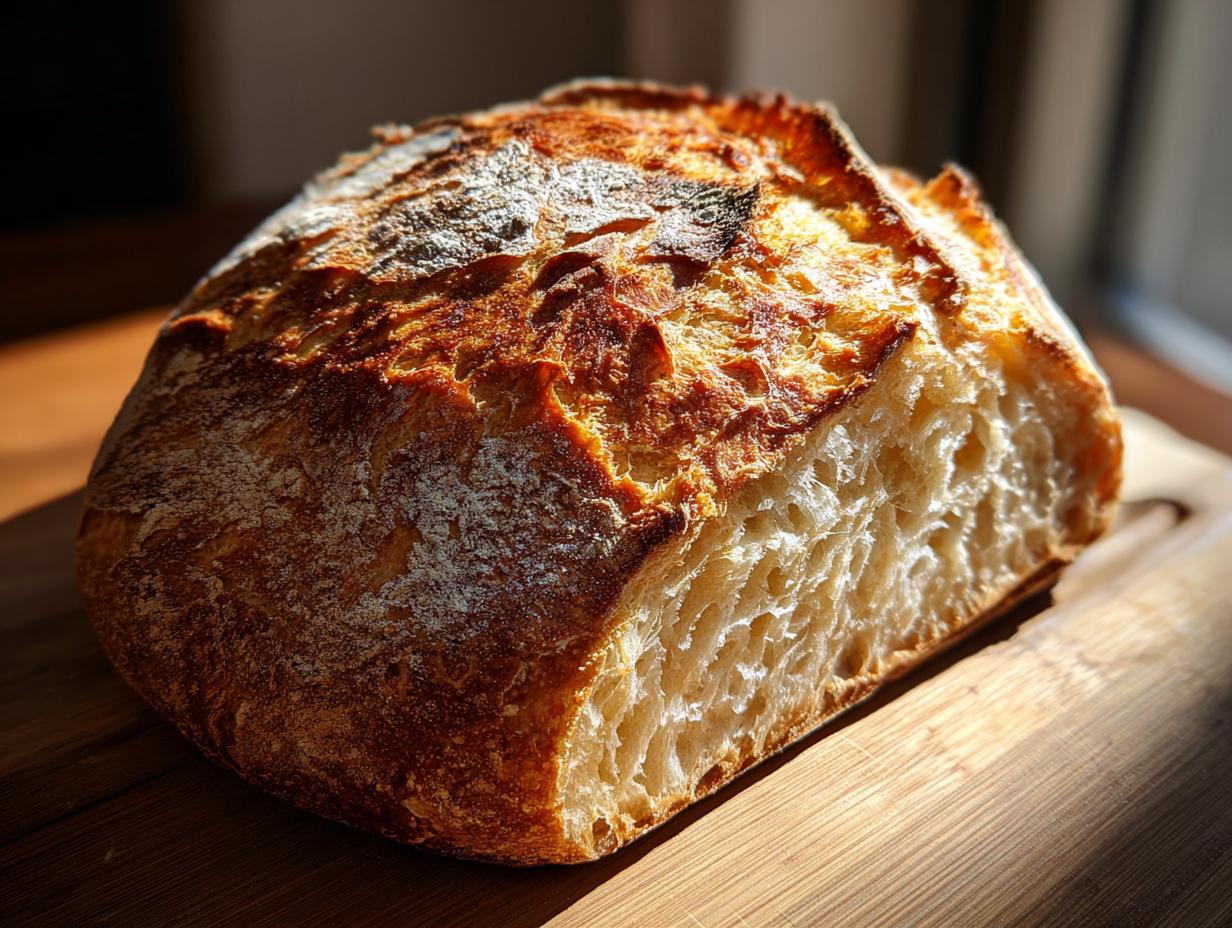

There’s something truly magical about baking your own sourdough bread, isn’t there? That incredible aroma filling your kitchen, the satisfying crackle of the crust as you slice into that perfectly tangy, chewy loaf – it’s pure bliss! If you’ve ever dreamt of bringing that bakery-quality sourdough bread to your own table, you’ve come to the right place. Forget those intimidating recipes that make you feel like you need a science degree; this is a reliable, step-by-step guide designed to help *you* bake amazing sourdough bread right at home. Trust me, it’s totally achievable, and oh-so-worth it!

- Why You'll Love This Sourdough Bread Recipe
- Essential Ingredients for Your Sourdough Bread
- Getting Started: Preparing Your Sourdough Starter
- Step-by-Step Guide to Baking Perfect Sourdough Bread
- Tips for the Best Sourdough Bread
- Understanding Your Sourdough Bread Baking
- Serving and Storing Your Sourdough Bread
- Estimated Nutritional Information
- Share Your Sourdough Bread Creations!
Why You’ll Love This Sourdough Bread Recipe
Seriously, making sourdough bread doesn’t have to be scary! You’ll love this recipe because:
- It’s surprisingly easy to follow: Even if you’re new to sourdough, these clear steps will guide you from start to finish. No more feeling overwhelmed!
- Bakery-quality results at home: Get that perfect crusty exterior and delightfully tangy, chewy interior that everyone raves about. It tastes even better when you’ve made it yourself!
- The satisfaction of homemade: There’s just something incredibly rewarding about pulling a beautiful loaf of sourdough bread from your own oven. It’s a true labor of love that fills your home with an amazing scent.
Essential Ingredients for Your Sourdough Bread
Alright, let’s talk about what you’ll need to make this glorious homemade sourdough bread. It’s honestly pretty simple, which is part of why I love it so much! Here are the stars of the show:
- 100g active sourdough starter: Make sure it’s happy and bubbly!
- 350g warm water: Not hot, not cold – just nice and warm to get things going.
- 500g bread flour: This is super important, folks! Using good quality bread flour really makes a difference for that chewy texture and nice rise in your sourdough bread. All-purpose just won’t cut it here.
- 10g fine sea salt: For flavor, of course!
Getting Started: Preparing Your Sourdough Starter
Okay, so before we even *think* about mixing dough, we need to get our sourdough starter ready. This is like the heart of our sourdough bread, and a happy starter means a happy loaf! For this recipe, you’ll want to feed your starter about 4 to 12 hours before you plan to start mixing. I usually do it right before bed if I’m baking the next morning, or first thing in the morning for an afternoon bake. You want it to be super bubbly and active – you know, when it’s really peaked and smells pleasantly sour, not like old gym socks! My starter sometimes gets a little sleepy if I don’t feed it consistently, so making sure it’s lively is the absolute first (and most important!) step for that best sourdough bread.
Step-by-Step Guide to Baking Perfect Sourdough Bread
Alright, my friends, this is where the magic really happens! We’re going to walk through this together, step by step, to get you that incredible sourdough bread you’re dreaming of. Grab your bowl, and let’s get baking!
Mixing and Autolyse for Your Sourdough Bread
First things first, get your big ol’ mixing bowl. Pour in that lovely warm water and gently stir in your active sourdough starter until it’s mostly dissolved. Don’t worry if there are a few little bits left! Now, add in your 500g of bread flour and the 10g of fine sea salt. Mix it all up with your hands or a spatula until you don’t see any dry flour patches left. It’ll look pretty shaggy and rough – that’s totally normal! Cover the bowl and let it sit for about 30 minutes. This little break is called autolyse, and it helps the flour absorb all the water, kick-starting gluten development for a better rise in your sourdough bread.
Developing Dough Strength with Stretch and Folds
Now for the fun part – building strength in our dough! It’s called stretch and folds, and it’s way easier than it sounds. After that 30-minute rest, wet your hands just a little (this stops the dough from sticking to you!). Grab one side of the dough, gently stretch it upward, and fold it over to the center of the bowl. Rotate the bowl and do the same thing with the other three sides. We’re going to do this every 30 minutes for about 2 hours, which means you’ll do about 4 sets total. This process is super important for developing the gluten structure needed for that perfect sourdough bread crumb.

Bulk Fermentation: Watching Your Sourdough Bread Rise
After those stretch and folds are done, it’s time for the dough to relax and do its thing during bulk fermentation. Just cover that bowl back up and let it sit at room temperature for around 4 to 6 hours. You’re looking for the dough to puff up and increase in volume by about 50%. When it looks airy, jiggly, and has a few bubbles peeking through, it’s ready for the next step. Honestly, don’t stress too much about the exact clock time here; it’s more about watching your dough! Some days it moves faster, some days slower, depending on how warm your kitchen is.
Shaping and Cold Proofing Your Loaf
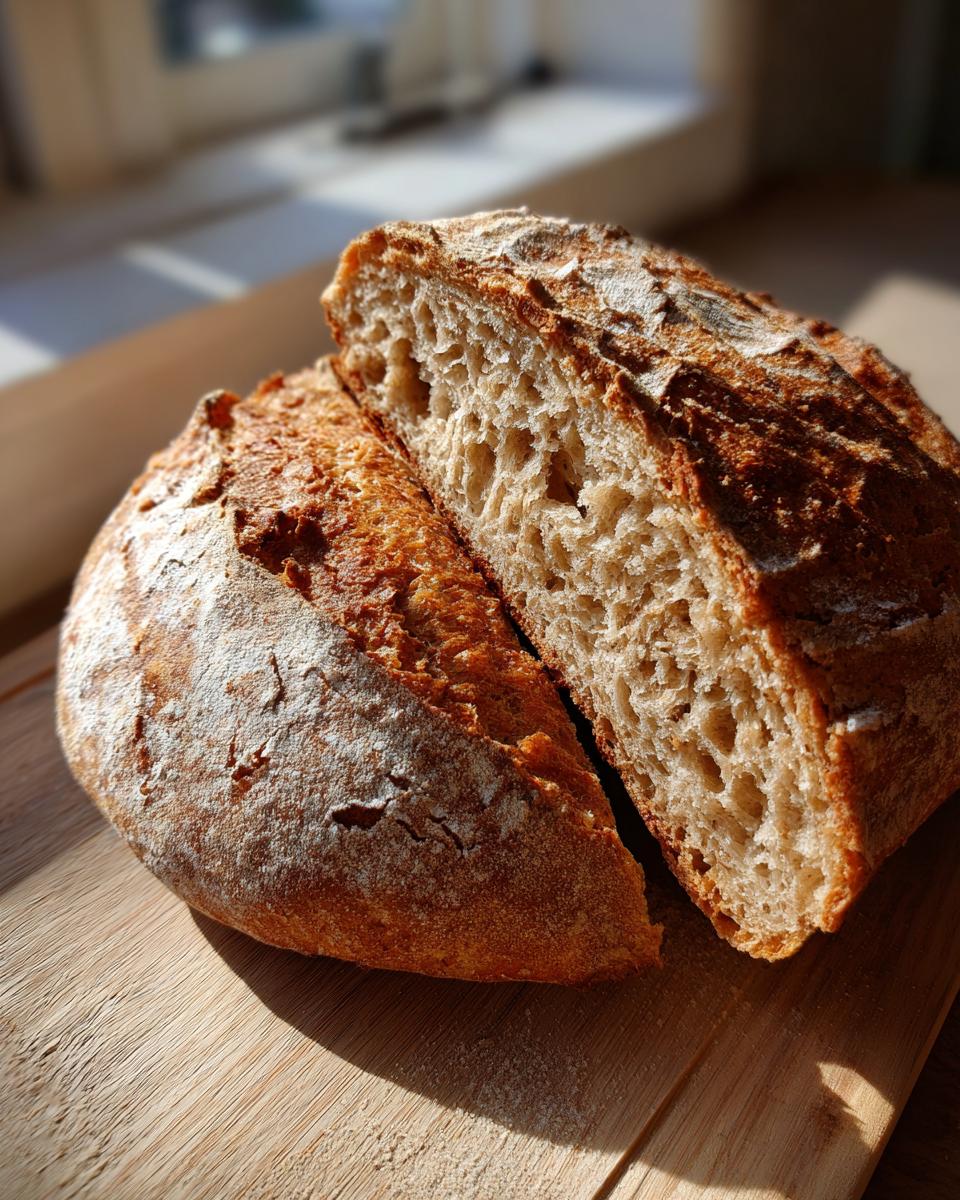
Okay, gently tip your beautifully fermented dough out onto a lightly floured surface. Try not to deflate all those lovely air bubbles we worked so hard to create! Now, shape it into a round (a boule) or an oval (a batard). Just gently coax it into the shape you want. Then, carefully place the shaped dough into a bowl that you’ve lined with a tea towel and sprinkled generously with flour, or even better, a floured proofing basket (also called a banneton). Cover it up, and pop it into the fridge for 12 to 24 hours. This cold proof is where a lot of that amazing sourdough flavor develops!
Baking Your Homemade Sourdough Bread
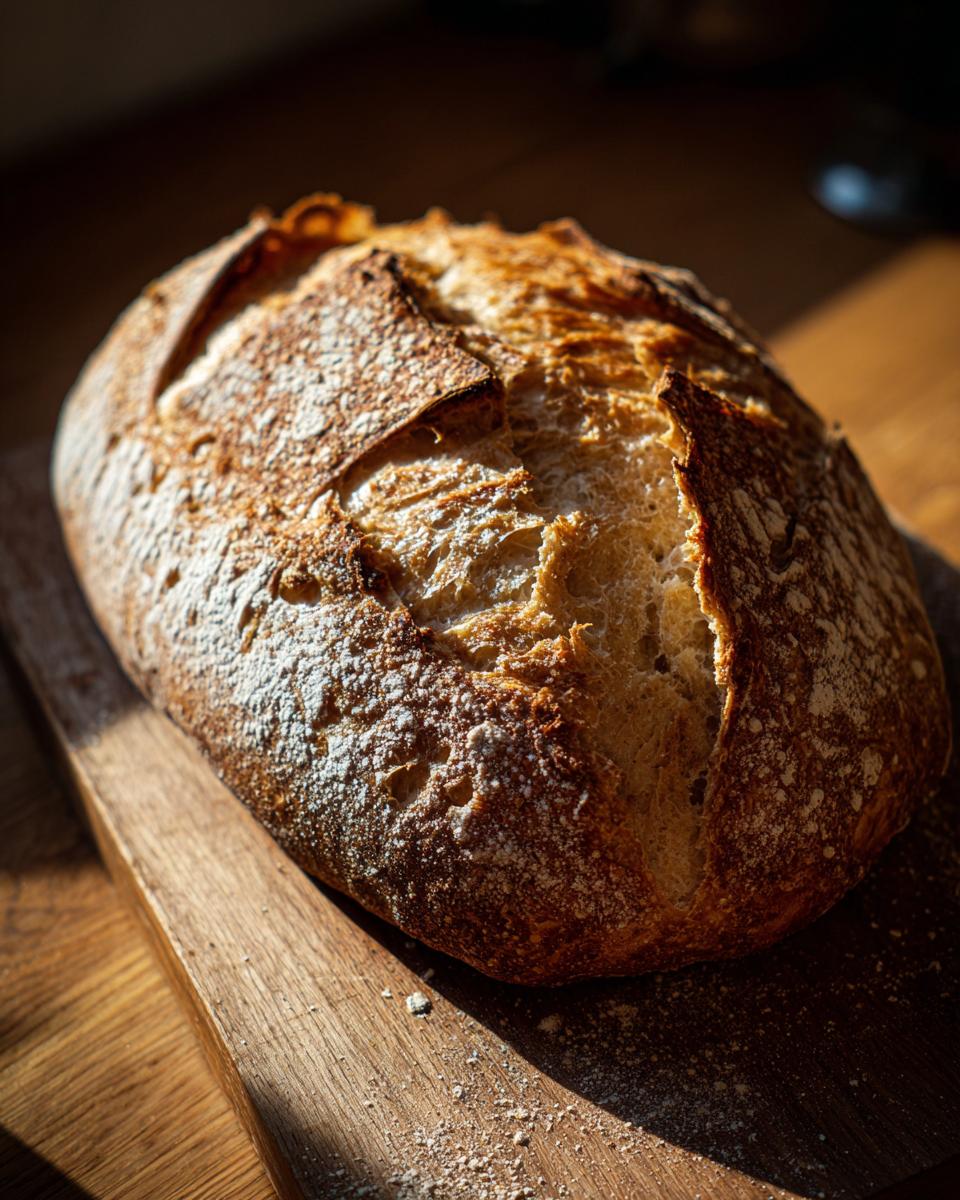
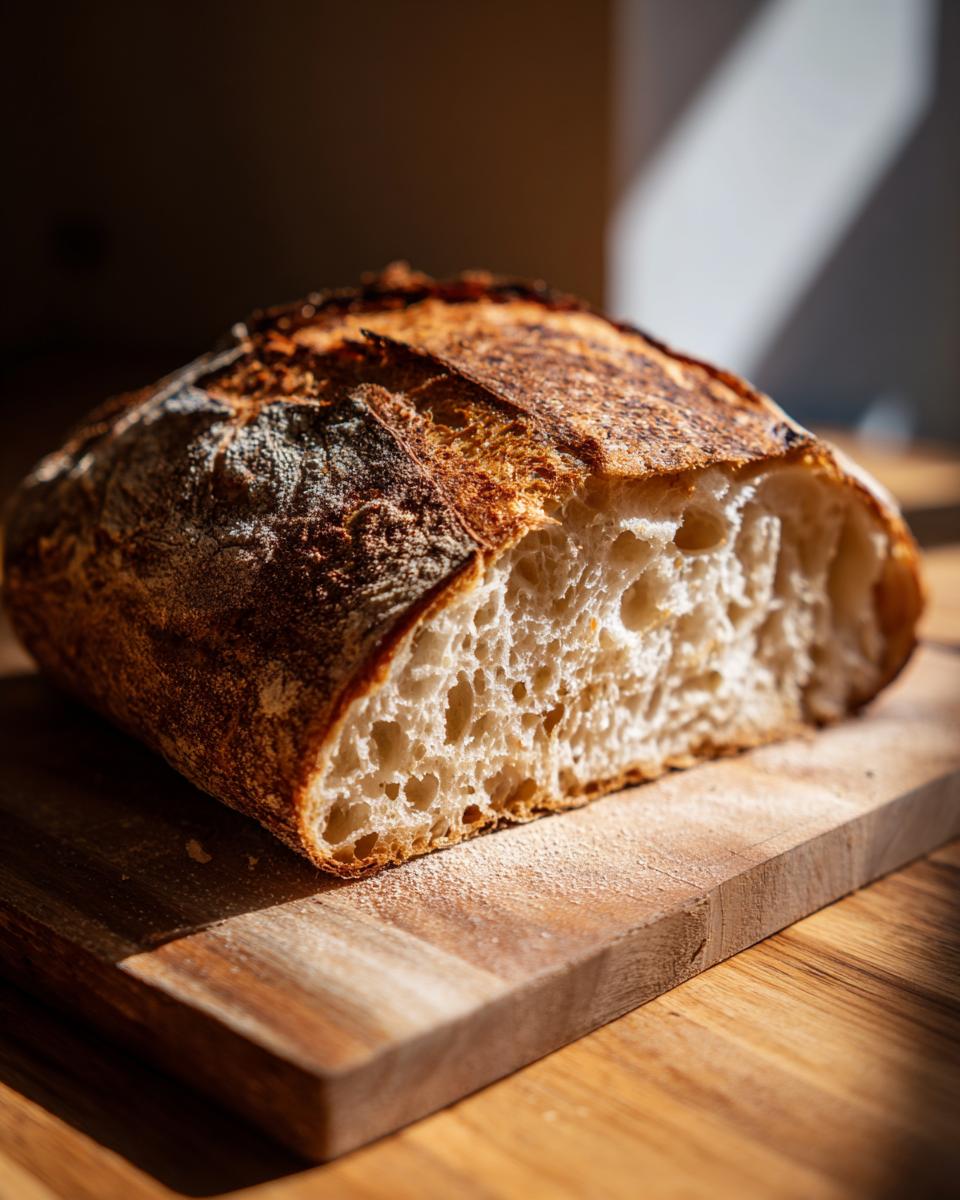
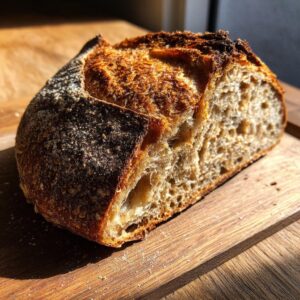
It’s bake day! Preheat your oven with your Dutch oven (lid on!) inside to a blazing 475°F (245°C) for at least 30 minutes. You want that pot screaming hot! Carefully take the super hot Dutch oven out of the oven. Take a piece of parchment paper and place it over your proofing basket, then flip the whole thing over. Your dough should slide right out onto the parchment. Now, quickly score the top of your loaf with a sharp knife or a baker’s lame to help control where it expands. Carefully lift the dough using the parchment paper and gently lower it into the hot Dutch oven. Pop the lid back on. Bake for 20 minutes with the lid on. Then, take the lid off and bake for another 20-25 minutes, or until that crust is a gorgeous deep golden brown and an instant-read thermometer stuck into the center reads between 205-210°F (96-99°C). Careful, it’s hot! For more tips on sourdough baking basics, check out this handy guide. Finally, gently remove your beautiful homemade sourdough bread from the Dutch oven and let it cool completely on a wire rack. Don’t skip this cooling part – it’s crucial for the crumb!
Tips for the Best Sourdough Bread
Alright, so you’ve mixed, folded, waited, and baked – congratulations! Achieving that *perfect* sourdough bread honestly comes down to a few little tricks and, of course, a bit of intuition that you build over time. My biggest piece of advice, and something my grandma always told me about baking in general, is to watch the dough, not the clock. Seriously, your kitchen temperature can speed things up or slow them down, so learn to read what your dough is telling you. For an extra-crispy crust, I love putting a small, oven-safe pan filled with water on the bottom rack of the oven during the first 20 minutes of baking with the lid on. That steam works wonders! And remember, a happy, active starter is going to give you the best flavor and rise, so give it some love!
Understanding Your Sourdough Bread Baking
Sometimes, especially with homemade sourdough, things can feel a little… mysterious, right? Don’t you worry, it’s all part of the fun! We’ve all been there, scratching our heads. Let’s clear up some common questions so you can feel super confident baking your easy sourdough bread. A happy starter is key to any great homemade sourdough loaf, so pay attention to what it’s telling you!
What if my sourdough starter isn’t active enough?
If your starter seems a bit sluggish, try feeding it more often, maybe twice a day for a few days. And make sure you’re using warm water – it really perks them up! Sometimes a little extra patience is all it takes for your little bubbly friend to get back to its energetic self.
How can I make my sourdough bread crustier?
Oh, that gorgeous, crackly crust! Using a Dutch oven is your best friend here, as it traps steam for you. If you don’t have one, try placing a pan of hot water on a lower rack in the oven when you start baking – that steam helps immensely! Also, don’t be afraid to bake it a little longer after the lid comes off until it’s a really deep, gorgeous brown.
Can I use different types of flour for sourdough bread?
You absolutely can, and it’s fun to experiment! Swapping out some of the bread flour for whole wheat or rye flour will give your sourdough a deeper, nuttier flavor and change the texture a bit. Just know that whole grains absorb more water, so you might need to adjust your liquid slightly when you’re mixing.
Serving and Storing Your Sourdough Bread
The absolute best way to enjoy your homemade sourdough bread is while it’s still slightly warm, sliced thick and maybe slathered with a good quality butter. When it comes to storing, a paper bag is your friend for keeping that crust nice and crisp overnight. Just pop any leftovers in there. If you need to keep it longer, wrap it tightly in plastic wrap or keep it in an airtight container. And if it gets a little stale? Just pop a slice in the toaster – it tastes almost as good as fresh!
Estimated Nutritional Information
So, here’s the estimated breakdown per slice of our glorious homemade sourdough bread: about 180 calories, 1g fat, 7g protein, and 38g carbohydrates with 2g of fiber. Remember, these numbers are just estimates and can wiggle a bit depending on the exact ingredients you use and how thick you slice it!
Share Your Sourdough Bread Creations!
Now it’s your turn! I absolutely *love* seeing your sourdough bread adventures. Did you bake a loaf? Did it turn out amazing? Let me know in the comments below – I read every single one! And please, share your gorgeous homemade sourdough bread photos with me on social media. Tag me so I can see your masterpieces!
PrintClassic Sourdough Bread
A step-by-step recipe for baking a crusty, tangy sourdough loaf at home, perfect for beginners.
- Prep Time: 30 minutes active time, plus starter feeding
- Cook Time: 45 minutes
- Total Time: 18 hours 15 minutes (includes cold proof)
- Yield: 1 loaf 1x
- Category: Bread
- Method: Baking
- Cuisine: American
- Diet: Vegetarian
Ingredients
- 100g active sourdough starter
- 350g warm water
- 500g bread flour
- 10g fine sea salt
Instructions
- Feed your sourdough starter 4-12 hours before you plan to mix the dough. It should be bubbly and active.
- In a large bowl, combine the active starter and warm water. Stir to dissolve the starter.
- Add the bread flour and salt to the bowl. Mix with your hands or a spatula until just combined and no dry flour remains. The dough will be shaggy.
- Cover the bowl and let the dough rest for 30 minutes (autolyse).
- Perform a series of stretch and folds: Wet your hands slightly. Grab one side of the dough, stretch it up, and fold it over the center. Rotate the bowl and repeat with the other three sides. Do this every 30 minutes for 2 hours (a total of 4 sets of stretch and folds).
- After the stretch and folds, cover the dough and let it bulk ferment at room temperature for 4-6 hours, or until it has increased in volume by about 50% and looks airy.
- Gently turn the dough out onto a lightly floured surface. Shape it into a round or oval loaf.
- Place the shaped dough into a floured proofing basket (banneton) or a bowl lined with a floured tea towel.
- Cover the basket and refrigerate for 12-24 hours for a cold proof.
- Preheat your oven to 475°F (245°C) with a Dutch oven inside for at least 30 minutes.
- Carefully remove the hot Dutch oven from the oven. Turn the dough out of the proofing basket onto a piece of parchment paper. Score the top of the loaf with a sharp knife or lame.
- Carefully lower the dough into the hot Dutch oven using the parchment paper. Cover with the lid.
- Bake for 20 minutes with the lid on.
- Remove the lid and bake for another 20-25 minutes, or until the crust is deep golden brown and the internal temperature reaches 205-210°F (96-99°C).
- Carefully remove the bread from the Dutch oven and let it cool completely on a wire rack before slicing.
Notes
- Maintaining a healthy sourdough starter is key to successful sourdough bread. Feed it regularly with equal parts flour and water.
- The fermentation times can vary depending on your room temperature. Watch the dough, not the clock.
- For a crispier crust, you can place a small oven-safe pan with water on the bottom rack of your oven during the initial baking phase.
Nutrition
- Serving Size: 1 slice
- Calories: 180
- Sugar: 1g
- Sodium: 350mg
- Fat: 1g
- Saturated Fat: 0g
- Unsaturated Fat: 1g
- Trans Fat: 0g
- Carbohydrates: 38g
- Fiber: 2g
- Protein: 7g
- Cholesterol: 0mg