 Skip to content

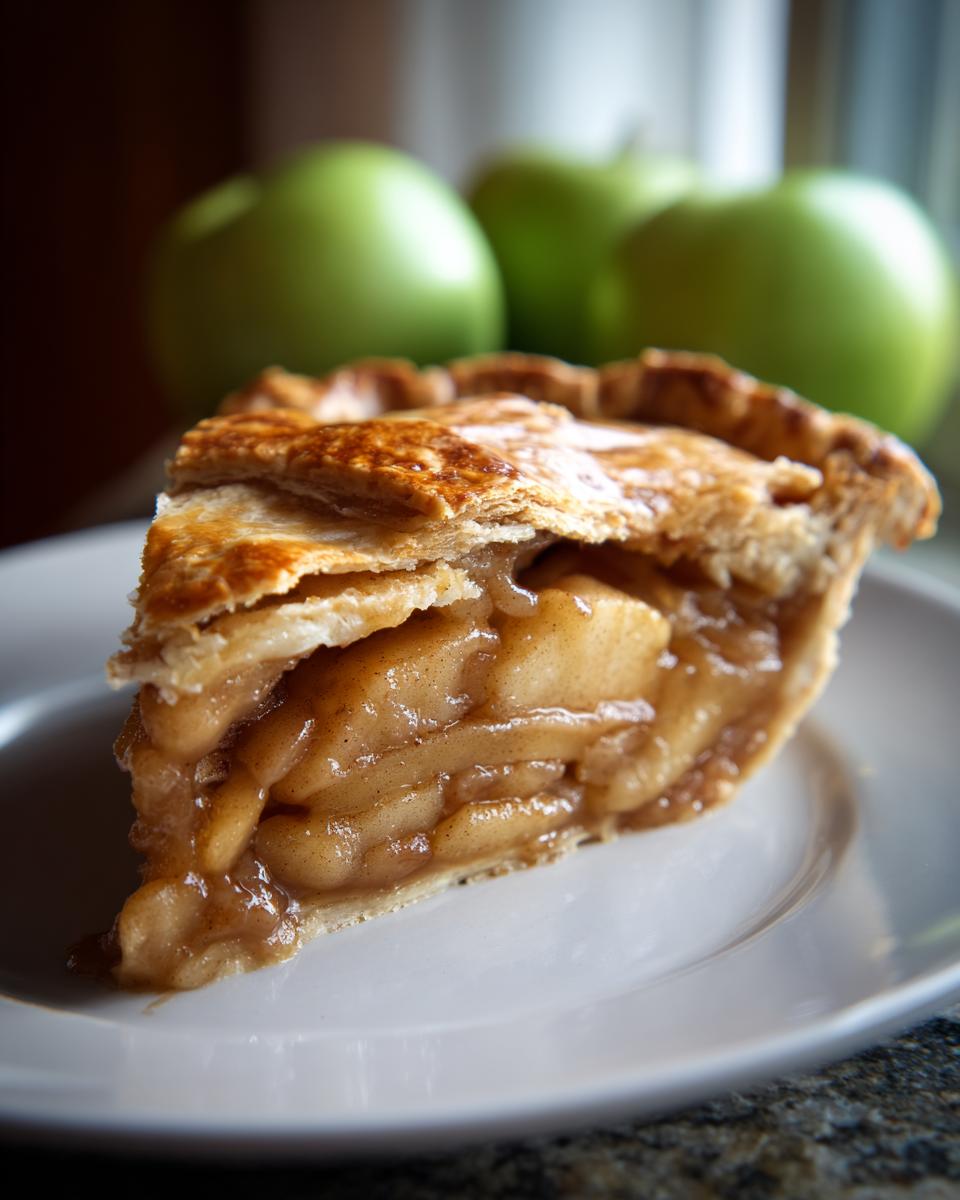
There’s just something about a warm, bubbling Apple pie that screams comfort, right? It’s that quintessential American dessert, the kind that fills your kitchen with the most amazing cinnamon-spiced aroma and instantly makes you think of grandma’s house. My own journey with baking this classic started in my grandmother’s kitchen, where flour dustings and the sweet scent of baked apples were just part of the love she poured into every dish. This recipe is my way of sharing that feeling with you – a classic apple pie with a crust that’s perfectly flaky and a filling that’s just bursting with warm, gooey, spiced apples. Trust me, it’s the kind of dessert that makes any day feel like a holiday, and it all starts with simple, honest ingredients and a little bit of kitchen magic. You can read more about my kitchen adventures and philosophy here!


- Why You'll Love This Classic Apple Pie Recipe
- Ingredients for the Perfect Apple Pie
- Crafting a Flaky Pie Crust for Your Apple Pie
- Creating the Irresistible Cinnamon Apple Filling
- Assembling and Baking Your Homemade Apple Pie
- Tips for the Best Flaky Pie Crust
- Serving and Storing Your Apple Pie
- Frequently Asked Questions about Apple Pie
- Nutritional Information (Estimated)
- Share Your Apple Pie Creation!
Why You’ll Love This Classic Apple Pie Recipe
You know, baking a really good apple pie can feel like a huge accomplishment, but this recipe makes it so totally doable! Here’s why you’re going to adore making this classic dessert:
- Super Easy to Make: Even if you’re just starting out, this recipe breaks it all down. No fancy tools, just simple steps for a fantastic pie!
- Unbeatable Flavor: That perfect combo of sweet, tender apples with warm cinnamon and nutmeg? It’s downright heavenly.
- Pure Comfort Food: Seriously, what’s better than a warm slice of apple pie? It just wraps you up like a cozy blanket.
- Perfect for Any Occasion: Whether it’s a weeknight treat, a family gathering, or a holiday centerpiece, this apple pie always hits the spot.
Ingredients for the Perfect Apple Pie
Alright, let’s talk about what you’ll need to get this amazing apple pie baking! These are the go-to ingredients that make all the difference. Don’t worry, they’re all pretty standard kitchen staples. Here’s the lineup:
- For the Crust: We’ll need one batch of my double pie crust. That means enough dough for a bottom and a top.
- For the Apple Filling:
- About 6 medium apples, peeled, cored, and thinly sliced. Granny Smith are my favorite for that little tartness, but a mix is always fun!
- 3/4 cup granulated sugar – this gives us that lovely sweetness.
- 1/4 cup all-purpose flour – this helps thicken up all those yummy apple juices.
- 1 teaspoon ground cinnamon – the star spice, really!
- 1/4 teaspoon ground nutmeg – just a pinch adds warmth.
- 1/4 teaspoon salt – don’t skip this, it makes all the flavors pop!
- 2 tablespoons unsalted butter, cut into little pieces – these melt into the apples and make them extra delicious.
- For the Topping:
- 1 large egg, beaten – this gives us our beautiful golden egg wash.
- 1 tablespoon granulated sugar – a little sprinkle on top for that perfect crunch!
Crafting a Flaky Pie Crust for Your Apple Pie
Okay, let’s talk about the *real* magic behind an incredible apple pie: that flaky, golden crust! This is where so many bakers get a little nervous, but trust me, it’s totally achievable. My grandmother always said the crust is like the dress for the pie – it has to look good and taste even better. The secret? Keeping everything super cold and not overworking the dough. Seriously, cold butter and a gentle touch are your best friends here. I’ve found that using ice-cold water and just bringing the dough together until it *barely* forms a ball is key. No kneading! Just enough to bring it together. And make sure you let it chill in the fridge for at least 30 minutes – that time is crucial for developing all those lovely flaky layers. You can find even more dandy tips for a perfect crust right here!
Creating the Irresistible Cinnamon Apple Filling
Now that our crust is ready to go, let’s whip up that glorious cinnamon apple filling! This is where all those beautiful apples get their star moment. My grandma always said to choose apples that hold their shape when baked – Granny Smith are fantastic for that little bit of tartness, but I also love tossing in a Fuji or Honeycrisp for sweetness and a bit of texture. It makes for a more interesting bite, you know?
Here’s what you do: grab a big ol’ bowl and toss in your thinly sliced, peeled apples. Then, sprinkle in the granulated sugar, the flour (this is our secret weapon for thickening all those lovely juices!), that warm cinnamon, a whisper of nutmeg, and a pinch of salt to really make everything sing. Gently toss it all together so every single apple slice is coated in that sweet, spicy goodness. You want to see those cozy spices clinging to the apples! It smells divine even at this stage; I sometimes sneak a bite here and there because… well, who can resist? You can find similar warm spice vibes in my apple cinnamon overnight oats, too!
Assembling and Baking Your Homemade Apple Pie
Alright, now for the best part: putting together and baking your beautiful homemade apple pie! It’s like the grand finale, and seeing it bake up golden and perfect is just immensely satisfying. Remember all those beautiful ingredients? They’re about to become something truly magical. This is where the comforting aroma really starts to fill your home, letting everyone know a delicious apple pie is on its way! If you’re looking for more pie ideas, my apple pie bars are a fun twist, and my apple crumble is a cozy favorite too!

Preheating and Preparing the Oven
First things first, let’s get that oven nice and hot! Preheat it to 425°F (220°C). This initial blast of heat is super important for getting that crust started off right, giving it a head start on that gorgeous golden color we’re aiming for. It really helps set the bottom crust before the filling has a chance to make everything soggy.
Constructing the Apple Pie
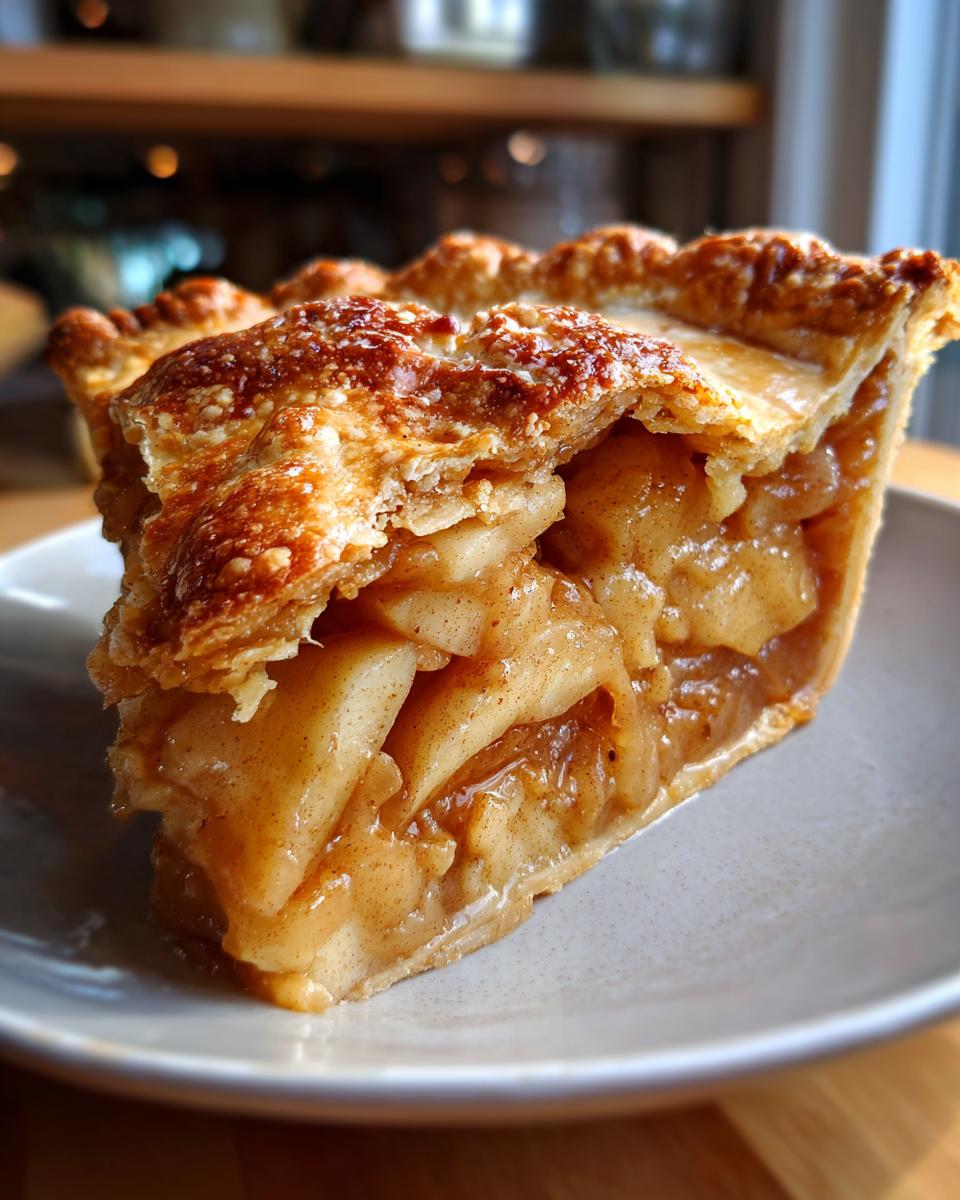
Now, let’s build this beauty. You’ve got your bottom crust chilling in the pie plate, right? Carefully spoon that luscious apple filling right into it, making sure to distribute the apples evenly. Don’t be shy with them! Dot the top of the apples with those little pieces of butter – trust me, this adds such a rich, delicious layer. For the top, you can either lay a whole second crust over the apples, trim it, fold the edges under to meet the bottom crust, and crimp them all around. Don’t forget to cut a few slits in the top so steam can escape! Or, if you’re feeling fancy (or just want extra crispy bits!), cut the dough into strips and weave them into a lattice top before sealing and crimping. Either way, you’re on your way to the most amazing apple pie!
Baking and Cooling Your Classic American Dessert
Time to bake! Pop that pie into the hot oven for 15 minutes at 425°F (220°C). Then, and this is important, reduce the oven temperature to 375°F (190°C) and let it bake for another 35 to 45 minutes. You’re looking for a crust that’s a deep golden brown and a filling that’s bubbling merrily through those vents or lattice. If you notice the edges getting too dark too fast, just loosely tent them with a piece of aluminum foil. Once it’s done, the hardest part: let it cool on a wire rack for at least 2-3 hours. I know, it’s torture! But this resting time is crucial for the juices to thicken up properly, so you get that perfect, gooey slice every time. It truly transforms it into the most wonderful classic American dessert.
Tips for the Best Flaky Pie Crust
Okay, let’s dive into how we get that *perfectly* flaky pie crust! It’s all about a few key things that Grandma always drilled into me. First off, and I can’t stress this enough, keep everything COLD. Your butter, your water, even your flour if you can manage it! Cold butter creates those steam pockets when it bakes, and that’s what gives you all those beautiful, delicate layers. I usually pop my flour and butter in the freezer for about 15 minutes before I start. And when you’re mixing the dough, be super gentle! You just want to bring it together until it *barely* holds, avoiding overworking it because that develops the gluten and makes your crust tough. Seriously, resist the urge to knead it like bread! Chill is your friend – always give that dough at least 30 minutes in the fridge before you roll it out. It makes all the difference for a truly amazing flaky pie crust. For more inspiration on good sides to pair with your pie, check out my side dish ideas!
Serving and Storing Your Apple Pie
Alright, the moment we’ve all been waiting for – slicing into that beautiful, golden apple pie! It’s heavenly served warm, especially with a big scoop of vanilla ice cream that slowly melts into the gooey apple filling, or maybe a dollop of freshly whipped cream. Seriously, it’s the ultimate comfort combo. If you happen to have any leftovers (which is rare in my house!), just pop them into an airtight container or pop-up container at room temperature for about two days. If it’s warmer than usual, or if you have more than two days’ worth, it’s best to pop it in the fridge. To reheat, just gently warm a slice in the oven at about 350°F (175°C) until it’s cozy again. For more sweet inspiration, don’t forget to peek at all my other dessert recipes!
Frequently Asked Questions about Apple Pie
Got questions about your apple pie adventure? I totally get it! Baking can sometimes feel like a science, but don’t worry, I’ve gathered some of the most common questions I hear. Let’s tackle them together!
What are the best apples for apple pie?
My go-to are apples that hold their shape and have a good balance of sweet and tart. Granny Smith are fantastic for that tartness, but I love mixing them with Honeycrisp or Fuji for a bit more sweetness and a lovely texture. A blend always makes for the most interesting bite!
How do I prevent my apple pie from being watery?
Ah, the dreaded watery pie! The trick is using a good thickener like flour or even a touch of cornstarch – I use about 1/4 cup of flour in my filling. Also, don’t skimp on the cooling time! Letting that beautiful pie rest for a few hours after baking is crucial for the juices to thicken up perfectly.
Can I make the pie crust ahead of time?
Absolutely! You can totally make your pie dough a day or two in advance and keep it wrapped tightly in the fridge. Some people even freeze it. Just let it warm up slightly on the counter for about 15-20 minutes before you’re ready to roll it out. It’s a great way to save time on busy baking days, kind of like how making homemade apple cider ahead of time is always a good idea!
What makes this a holiday pie recipe?
Honestly, who needs a special reason for apple pie? But it truly shines during the holidays! The warm spices like cinnamon and nutmeg feel so festive, and a golden, bubbling pie just makes any gathering feel extra special and celebratory. It’s the ultimate holiday pie recipe that practically screams ‘cozy traditions’!
Nutritional Information (Estimated)
Now, let’s chat about the numbers, though remember these are just estimates and can totally change depending on the exact ingredients you use! A typical slice of this wonderful apple pie usually comes in around 350 calories, with about 18g of fat, 45g of carbs, and 3g of protein. It’s a treat, for sure, and totally worth it!
Share Your Apple Pie Creation!
Now that you’ve got the recipe and all my best tips, I really hope you give this amazing apple pie a try! I’d absolutely LOVE to hear what you think. Drop a comment below, tell me how it turned out, or share your own favorite apple pie memories. Your feedback truly makes my day and helps other bakers too! If you have any questions or need a hand, feel free to reach out!
PrintClassic Apple Pie Recipe

Bake a traditional American apple pie with a flaky crust and a warm, cinnamon-spiced apple filling. This recipe guides you through creating a comforting dessert perfect for any occasion.
- Prep Time: 30 min
- Cook Time: 50 min
- Total Time: 80 min
- Yield: 8 servings 1x
- Category: Dessert
- Method: Baking
- Cuisine: American
- Diet: Vegetarian
Ingredients
- 1 recipe for double pie crust
- 6 cups thinly sliced peeled apples (about 6 medium apples)
- 3/4 cup granulated sugar
- 1/4 cup all-purpose flour
- 1 teaspoon ground cinnamon
- 1/4 teaspoon ground nutmeg
- 1/4 teaspoon salt
- 2 tablespoons unsalted butter, cut into small pieces
- 1 large egg, beaten (for egg wash)
- 1 tablespoon granulated sugar (for sprinkling)
Instructions
- Preheat your oven to 425°F (220°C).
- On a lightly floured surface, roll out one disk of pie dough into a 12-inch circle. Carefully transfer it to a 9-inch pie plate. Trim the edges, leaving about a 1/2-inch overhang.
- In a large bowl, combine the sliced apples, 3/4 cup sugar, flour, cinnamon, nutmeg, and salt. Toss gently to coat the apples evenly.
- Pour the apple mixture into the prepared pie crust. Dot the top with the small pieces of butter.
- Roll out the second disk of pie dough into another 12-inch circle. You can either place this whole circle over the filling and cut vents, or cut it into strips to create a lattice top.
- If using a full top crust, place it over the filling. Trim the edges, fold the overhang under, and crimp the edges to seal. Cut several slits in the top crust to allow steam to escape.
- If making a lattice, cut the dough into 1-inch wide strips. Weave the strips over the apple filling, pressing the ends onto the bottom crust edge. Trim and crimp the edges.
- Brush the top crust (or lattice strips) with the beaten egg wash and sprinkle with the remaining 1 tablespoon of sugar.
- Bake for 15 minutes at 425°F (220°C).
- Reduce the oven temperature to 375°F (190°C) and continue baking for another 35-45 minutes, or until the crust is golden brown and the filling is bubbly. If the crust starts to brown too quickly, loosely tent the pie with aluminum foil.
- Let the pie cool on a wire rack for at least 2-3 hours before slicing and serving. This allows the filling to set properly.
Notes
- For a richer flavor, you can add 1 tablespoon of lemon juice to the apple filling.
- Consider using a mix of apple varieties for a more complex flavor profile.
- Serve warm with vanilla ice cream or whipped cream for a classic treat.
Nutrition
- Serving Size: 1 slice
- Calories: 350
- Sugar: 30g
- Sodium: 200mg
- Fat: 18g
- Saturated Fat: 10g
- Unsaturated Fat: 8g
- Trans Fat: 0g
- Carbohydrates: 45g
- Fiber: 3g
- Protein: 3g
- Cholesterol: 40mg