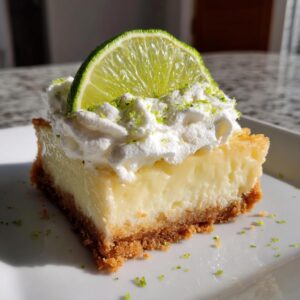
I’ll never forget the first time I tasted real key lime pie on vacation in Florida. The tangy-sweet filling and buttery graham cracker crust was pure sunshine in every bite! But making a whole pie can feel like a production, especially during hot summer months. That’s why I fell in love with these easy key lime pie bars – all the bright citrus flavor I crave without turning on my oven. They’ve become my secret weapon for meal planning and last-minute summer gatherings. Just mix, chill, and you’ll have perfect hand-held treats that taste like you spent hours in the kitchen!
- Why You'll Love These Key Lime Pie Bars
- Key Lime Pie Bars Ingredients
- How to Make Key Lime Pie Bars
- Tips for Perfect Key Lime Pie Bars
- Key Lime Pie Bars Variations
- Storing and Serving Key Lime Pie Bars
- Key Lime Pie Bars Nutrition Information
- Frequently Asked Questions
- Share Your Key Lime Pie Bars Experience
Why You’ll Love These Key Lime Pie Bars
Trust me, once you try these bars, you won’t go back to regular pie! Here’s why they’re my go-to dessert:
- No oven needed – Mix, chill, and done! Perfect for those sweltering summer days when you can’t bear to turn on the oven.
- Freezer magic – Make them ahead and store in your freezer for up to a month (though they never last that long in my house!).
- Instant summer vibes – That bright citrus flavor instantly transports me to beach vacations, even if I’m just in my backyard.
- Perfect for sharing – The square shape makes them ideal for parties, potlucks, or sneaking just *one* more from the fridge.
- Beginner-friendly – No fancy skills needed – if you can stir and press crumbs, you’ve got this!
Key Lime Pie Bars Ingredients
What I love about these bars is how simple the ingredient list really is – nothing fussy, just pantry staples that pack a punch of flavor! Here’s everything you’ll need, grouped perfectly so you can tackle this recipe in two easy parts:
For the Graham Cracker Crust:
- 1 1/2 cups graham cracker crumbs – about 12 full sheets crushed (I like to pulse mine in the food processor for perfect texture)
- 1/4 cup granulated sugar – just enough sweetness to balance the tangy filling
- 6 tablespoons melted butter – unsalted is my go-to, and make sure it’s barely cooled so it mixes beautifully
For the Creamy Lime Filling & Topping:
- 1 (14 oz) can sweetened condensed milk – the magic ingredient that makes the filling so luxuriously smooth
- 1/2 cup key lime juice – fresh if you can find tiny key limes, but bottled works great too (I won’t judge!)
- 1 teaspoon lime zest – this is where the bright flavor really pops, so don’t skip it!
- 1 cup heavy whipping cream – chilled is best for whipping up light and fluffy
- 2 tablespoons powdered sugar – just enough to sweeten the whipped cream topping
See? Nothing complicated – just quality ingredients that let that gorgeous lime flavor shine. Now let me show you how easy these come together!
How to Make Key Lime Pie Bars
Okay, friends, let me walk you through my foolproof method for these dreamy key lime pie bars. I’ve made this recipe dozens of times (you know, for “quality control”), and these steps never fail me! The best part? You’ll spend more time licking the spoon than actually working.
Preparing the Graham Cracker Crust
First, grab that 8×8 pan and line it with parchment paper – this little trick makes removing the bars SO much easier later! Now, mix your graham crumbs, sugar, and melted butter in a bowl until it looks like wet sand. Don’t be shy – really press this mixture into your pan with all your might (I use the bottom of a measuring cup for perfect packing). Pop it in the fridge for 15 minutes while you make the filling – this quick chill keeps the crust crisp!
Making the Creamy Lime Filling
Now for the star of the show! In a fresh bowl, whisk together your sweetened condensed milk, lime juice, and zest. Keep whisking until it’s completely smooth – no lumps allowed! This is when my kitchen starts smelling like a tropical getaway. Pro tip: if you want extra zing, add another teaspoon of zest. The filling should be pourable but thick, like a luxurious custard.
Assembling and Freezing the Bars
Time to bring it all together! Pour your gorgeous lime filling over the chilled crust, using a spatula to spread it evenly right to the edges. Now the hardest part – patience! Freeze for at least 2 hours until set (I know, the waiting kills me too). While that happens, whip your cream with powdered sugar to stiff peaks. Spread it over the frozen bars, slice into perfect squares, and prepare for compliments!
Tips for Perfect Key Lime Pie Bars
After making these bars more times than I can count (seriously, my neighbors now expect them at every barbecue!), I’ve picked up some tricks that make all the difference:
- No fresh limes? Bottled key lime juice works beautifully—just look for 100% juice with no added sugar. My grocery store’s baking aisle always has it!
- Want show-stopping bars? Freeze them overnight instead of just 2 hours. The texture becomes dreamily firm, like the best freezer cheesecake.
- Garnish magic: Right before serving, sprinkle extra lime zest over the whipped cream—it adds vibrant color and that irresistible citrus perfume.
- Clean slices: Run your knife under hot water between cuts for picture-perfect edges. Trust me, it’s worth the extra 30 seconds!
- Fun twist: For a pretty ombré effect, swirl a drop of green food coloring into half the whipped cream before topping.
These little tweaks have saved me from many dessert disasters over the years—hope they help you too!
Key Lime Pie Bars Variations
One of my favorite things about this recipe is how easily you can mix it up! Here are some fun twists my family begs for:
- Tropical Crust: Swap 1/4 cup graham crumbs for toasted coconut – it adds the most amazing crunch and beachy flavor!
- Lighter Option: Use Greek yogurt instead of whipped cream topping – still creamy but with a delightful tang.
- Zesty Upgrade: Add 1/2 teaspoon lime oil to the filling for an extra intense citrus punch.
- Berry Swirl: Drop spoonfuls of raspberry jam onto the filling before freezing, then lightly marble with a knife.
Honestly, half the fun is playing around – what variations will you try first?
Storing and Serving Key Lime Pie Bars
Here’s the beautiful thing about these bars – they’re almost better the next day! For short-term storage, keep them refrigerated in an airtight container for up to 4 days (though they rarely last that long in my house). Want to prep ahead? These freeze like a dream – just wrap individual bars in plastic wrap and they’ll stay perfect for a whole month! When serving, I always pull them from the fridge 10 minutes early to take the chill off – that’s when the texture is absolute perfection. And for picture-perfect slices? A warm knife wiped clean between cuts makes all the difference. Trust me, serve these chilled with an extra sprinkle of zest, and watch how quickly they disappear!
Key Lime Pie Bars Nutrition Information
Now, I’m no nutritionist, but let’s be real – we all want to know what we’re indulging in! These key lime pie bars are definitely a treat, with each square packing that perfect balance of sweet and tangy. Keep in mind that nutritional values can vary based on the specific brands of ingredients you use (like full-fat vs. light condensed milk). As with any good dessert, portion control is key… though I won’t judge if you sneak an extra square – I’ve been there!
Frequently Asked Questions
Can I use regular limes instead of key limes?
Absolutely! While key limes have that signature tartness, regular Persian limes work just fine in a pinch. You’ll get slightly different flavor – a bit less floral, but still wonderfully citrusy. Just stick to the same 1/2 cup measurement. I’ve made them both ways, and trust me, no one’s ever complained!
How long do these key lime pie bars keep?
These no-bake bars are freezer champs! Wrapped well, they’ll stay perfect for up to a month frozen (slice them first for easy grab-and-go treats). In the fridge, they hold up beautifully for 4-5 days – just pop some plastic wrap over the cut sides to prevent drying. Though between you and me, they rarely last past day two in my house!
Will the whipped cream topping freeze well?
Here’s my little secret: the topping actually freezes surprisingly well if you whip it to stiff peaks first! It might soften slightly when thawing, but a quick whisk brings it right back. For summer citrus bars that need to travel, I sometimes skip the topping and just dust with powdered sugar before serving.
Can I make these gluten-free?
You bet! Simply swap the graham crackers for your favorite gluten-free version – I’ve had great luck with gluten-free ginger snaps too for a fun twist. Just make sure whatever substitute you use has about the same crumb texture when mixed with butter. Easy peasy!
Got more questions? Drop them in the comments – I love helping troubleshoot these freezer-friendly treats!
Share Your Key Lime Pie Bars Experience
Alright, my fellow lime-loving friends, it’s story time! Did you make these dreamy bars? I’d love to hear all about your kitchen adventures – did you stick with my classic version or put your own spin on it? Snap a photo of your masterpiece (even if the slices aren’t picture-perfect… mine rarely are!) and tag me so I can cheer you on. And if you loved them as much as I do, leave a star rating below – nothing makes my day more than knowing I helped someone create a little citrusy joy in their kitchen!
PrintKey Lime Pie Bars
A hand-held twist on classic key lime pie with a graham cracker crust and creamy lime filling. No-bake and freezer-friendly for easy summer desserts.
- Prep Time: 20 min
- Cook Time: 0 min
- Total Time: 2 hours 20 min
- Yield: 9 bars 1x
- Category: Dessert
- Method: No-Bake
- Cuisine: American
- Diet: Vegetarian
Ingredients
- 1 1/2 cups graham cracker crumbs
- 1/4 cup sugar
- 6 tbsp melted butter
- 1 (14 oz) can sweetened condensed milk
- 1/2 cup key lime juice
- 1 tsp lime zest
- 1 cup heavy whipping cream
- 2 tbsp powdered sugar
Instructions
- Mix graham cracker crumbs, sugar, and melted butter. Press into a lined 8×8 pan.
- Chill crust for 15 minutes.
- Whisk condensed milk, lime juice, and zest until smooth. Pour over crust.
- Freeze for 2 hours or until set.
- Whip cream and powdered sugar until stiff peaks form. Spread over bars.
- Slice and serve chilled.
Notes
- Use bottled key lime juice if fresh limes are unavailable.
- For a firmer texture, freeze bars overnight.
- Garnish with extra lime zest before serving.
Nutrition
- Serving Size: 1 bar
- Calories: 280
- Sugar: 24g
- Sodium: 180mg
- Fat: 16g
- Saturated Fat: 10g
- Unsaturated Fat: 5g
- Trans Fat: 0g
- Carbohydrates: 30g
- Fiber: 0g
- Protein: 4g
- Cholesterol: 45mg


