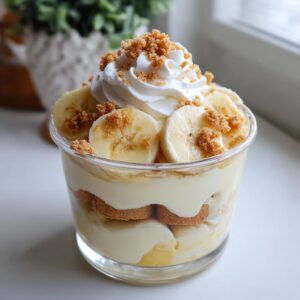
I’ll never forget the first time I made banana pudding cups for my niece’s birthday party. Those little mason jars filled with creamy pudding, ripe banana slices, and those crunchy vanilla wafers disappeared faster than I could say “seconds please!” That’s when I realized – individual banana pudding cups aren’t just adorable, they’re downright genius for feeding a crowd. No messy scooping, no fighting over who gets the biggest portion, and honestly? Everything tastes better when it’s served in its own cute little dish.
This no-bake wonder comes straight from my Southern roots – my Grandma called it “busy mom’s banana pudding” because you can whip it up without ever turning on the oven. The best part? These banana pudding cups are meal planning gold. Make them ahead, pop ’em in the fridge, and you’ve got dessert handled for days. Whether you’re hosting summer cookouts or just craving a nostalgic treat faster than you can dial takeout, these little cups of happiness deliver every single time.
- Why You'll Love These Banana Pudding Cups
- Ingredients for Banana Pudding Cups
- How to Make Banana Pudding Cups
- Tips for Perfect Banana Pudding Cups
- Variations for Banana Pudding Cups
- How to Store Banana Pudding Cups
- Nutritional Information for Banana Pudding Cups
- Frequently Asked Questions About Banana Pudding Cups
- Share Your Banana Pudding Cups Experience
Why You’ll Love These Banana Pudding Cups
Listen, I know we’re all busy these days, and that’s exactly why these little cups of joy are about to become your new best friend. Trust me – once you try this version, you’ll never go back to scooping messy banana pudding from a big dish again! Here’s why:
- No oven required: On hot summer days? Absolute lifesaver. Whip them up in your cool kitchen while the AC does its thing.
- Meal planning magic: Make ’em Sunday, enjoy all week – these actually get better as they sit (unlike my kids’ patience after school).
- Perfect portions: No more soggy leftovers! Everyone gets their own cute cup with just the right amount of pudding, bananas, and wafer crunch.
- That Southern charm: It’s that classic banana pudding taste you grew up loving, but updated for real life.
Honestly, the hardest part? Not eating all six servings yourself while “testing” them straight from the fridge. Not that I’d know anything about that…
Ingredients for Banana Pudding Cups
Okay, let’s gather our goodies! Here’s everything you’ll need for six perfect banana pudding cups – and I promise, most of these are probably already in your pantry. My grandma always said “simple ingredients make the happiest bellies,” and she wasn’t wrong!
- For the pudding:
- 2 cups whole milk (trust me, the extra fat makes all the difference)
- 1 (3.4 oz) box instant vanilla pudding mix (the secret weapon!)
- For the whipped cream:
- 1 cup heavy cream, chilled (cold bowl = happy whipped cream)
- 2 tbsp granulated sugar
- 1 tsp vanilla extract (the real stuff, please!)
- For layering:
- 3 ripe bananas, sliced 1/4″ thick (those brown speckles mean perfect sweetness)
- 1 (11 oz) box vanilla wafers (Nilla or bust in our house)
See? Nothing fancy – just good, honest ingredients waiting to become something magical. Now grab that big mixing bowl and let’s make some memories!
How to Make Banana Pudding Cups
Alright, friends – time for the fun part! Making these banana pudding cups is so easy you could practically do it with your eyes closed (though I don’t recommend it – pudding mishaps are sticky business). Just follow these simple steps and you’ll be in creamy, dreamy dessert heaven in no time.
Step 1: Prepare the Pudding Mixture
Grab your biggest mixing bowl and whisk together the milk and pudding mix like your life depends on it – okay, maybe not that dramatic. But give it a good 2 minutes of vigorous whisking until it transforms from liquid magic into thick, luscious pudding. Pro tip: When you lift the whisk, the pudding should coat the wires without dripping off immediately. That’s when you know it’s perfect!
Step 2: Whip the Cream
Now for the cloud-like topping! Chill your bowl and beaters for 10 minutes first – this helps the cream whip faster. Pour in the cold heavy cream, sugar, and vanilla, then beat on high until you get glorious stiff peaks. How to test? Turn your beaters upside down – if the cream stands tall like Mount Everest and doesn’t flop over, you’re golden! This airy wonder will make your pudding lighter than my Aunt Marge’s diet resolutions every January.
Step 3: Layer the Banana Pudding Cups
Time to build our edible towers of joy! Start with a layer of vanilla wafers at the bottom of each cup – I like to break some for better coverage. Next comes a layer of banana slices (don’t be shy!), then a scoop of the pudding mixture. Repeat until your cups are nearly full, ending with pudding. For the grand finale? Crush a few extra wafers between your hands and sprinkle them on top like edible confetti. Now the hardest part – popping them in the fridge for at least 2 hours so all those flavors can become best friends!
Tips for Perfect Banana Pudding Cups
After making maybe three hundred of these babies (okay, maybe I lost count after the church picnic incident), I’ve picked up some foolproof tricks for banana pudding cup perfection. First – those bananas better have brown speckles, or don’t even bother! Ripe bananas melt into the pudding like sweet little miracles. Here’s Grandma’s sneaky trick: add a tiny splash of banana liqueur to the pudding mix if you’re feeling fancy (just between us – it’ll make people think you’re a dessert wizard).
And listen carefully now – resist the urge to skip the chilling time. Those 2 hours in the fridge aren’t just a suggestion. They’re what transform wobbly pudding into velvety clouds and turn crunchy wafers into that magical soft-yet-snappy texture we all crave. Make these the night before for easy meal planning, but hide them behind the milk carton unless you want “samplers” disappearing before dessert time!
Variations for Banana Pudding Cups
The beautiful thing about these pudding cups? They’re like a blank canvas for your dessert dreams! Swap in gluten-free wafers if needed – nobody will know the difference, promise. Want to impress? Add dark chocolate shavings between layers like my cousin does (honestly, why didn’t I think of that first?). Or go full Southern belle and swap vanilla pudding for butterscotch – instant flavor fireworks! The options are endless, just like my love for these little cups of joy.
How to Store Banana Pudding Cups
Okay, truth time – these banana pudding cups probably won’t last long enough for storage advice to matter! But just in case you miraculously have leftovers (or you’re meal planning like a boss), here’s the scoop. Cover them tightly and refrigerate for up to 3 days – the bananas will soften but stay delicious. Pro tip? Wait to add the final wafer sprinkle until serving so they stay gloriously crunchy!
Nutritional Information for Banana Pudding Cups
Alright, let’s talk numbers – but don’t let this scare you off from enjoying every creamy bite! Each banana pudding cup clocks in at about 320 calories, with 12g of fat (that’s the good stuff from the cream and bananas!), 4g of protein, and 48g of carbs. Now, listen – these numbers might wiggle a bit depending on your exact ingredients (like if you go wild with extra whipped cream – no judgment here!). At the end of the day, these little cups are about joy, not journals. But hey, knowledge is power… right before dessert!
Frequently Asked Questions About Banana Pudding Cups
I’ve gotten so many sweet questions about these banana pudding cups since I first shared the recipe at my niece’s birthday party! Here are the ones that pop up almost every time, complete with my very honest (and possibly pudding-stained) answers:
Can I use instant pudding mix?
Absolutely! That’s actually my secret weapon for these no-bake banana pudding cups. Instant pudding sets up beautifully without any cooking – just whisk it with cold milk and you’re golden. Though if you’re feeling fancy, homemade pudding works too (just let it cool completely first).
How long do banana pudding cups last in the fridge?
They’re happiest within 3 days – the bananas start getting too soft after that. Though honestly? Between you and me, mine never last that long! Pro meal planning tip: Assemble everything but the banana slices up to a day ahead, then add bananas just before serving for perfect texture.
Can you freeze individual banana pudding cups?
Oh honey, I learned this the hard way! The pudding and whipped cream separate when thawed, and the bananas turn into sad little mush puddles. But here’s my workaround – freeze just the pudding mixture in portion cups for up to a month, then assemble fresh when you’re ready. It’s like instant dessert magic!
What if I can’t find vanilla wafers?
No stress! Shortbread cookies make a dreamy substitute, or try crushed graham crackers for that perfect crunch. For gluten-free folks, there are great GF vanilla wafer options out there now too – just check the baking aisle.
Share Your Banana Pudding Cups Experience
Alright, friend – now it’s your turn! Did your crew go crazy for these banana pudding cups like mine always does? (Bonus points if you caught someone licking their jar clean – happens every time at our house!) Drop a comment below and tell me about your experience – did you add any fun twists? How many seconds did your family beg for? Your stories make my day brighter than a jar full of whipped cream! And hey, if you loved this recipe as much as we do, give it a star rating so more pudding lovers can find this little taste of happiness.
PrintBanana Pudding Cups
Individual no-bake banana pudding cups with wafers, perfect for dessert lovers.
- Prep Time: 15 min
- Cook Time: 0 min
- Total Time: 2 hours 15 min
- Yield: 6 servings 1x
- Category: Dessert
- Method: No-Bake
- Cuisine: Southern
- Diet: Vegetarian
Ingredients
- 2 cups milk
- 1 box vanilla pudding mix
- 1 cup heavy cream
- 2 tbsp sugar
- 1 tsp vanilla extract
- 3 bananas, sliced
- 1 box vanilla wafers
Instructions
- Whisk milk and pudding mix in a bowl until thickened.
- In another bowl, whip heavy cream, sugar, and vanilla until stiff peaks form.
- Fold the whipped cream into the pudding mixture.
- Layer vanilla wafers, banana slices, and pudding mixture in cups.
- Repeat layers and top with crushed wafers.
- Chill for at least 2 hours before serving.
Notes
- Use ripe bananas for the best flavor.
- Make ahead for easy meal planning.
Nutrition
- Serving Size: 1 cup
- Calories: 320
- Sugar: 25g
- Sodium: 180mg
- Fat: 12g
- Saturated Fat: 6g
- Unsaturated Fat: 5g
- Trans Fat: 0g
- Carbohydrates: 48g
- Fiber: 2g
- Protein: 4g
- Cholesterol: 30mg


